Quantcast
Channel: itouhiroはてなブログ
Viewing all 107 articles
Browse latest View live

フリーフォントのサブセットを作り、Webフォント化

$
0
0

フリーフォントのサブセット(部分集合、つまり特定の文字だけを含むことで軽量化したフォント)を作り、Webフォントにする方法を説明します。


FontForgeを使用して、フリーフォントであるM+フォントのサブセットを作るには私は以下の手順を取りました。M+フォント以外のフリーフォントにも、この手順を使うことができます。

  1. 使用したい文字をすべて含んだテキストファイルをUTF-8で保存。
  2. そのテキストファイルを以下のスクリプト listChar.js に通して、収録文字リストを作成。
  3. 収録文字リストを、以下のスクリプト listCharFF.js に通して、FontForgeスクリプトを作成。
  4. FontForgeでフォントを読み込み、FontForgeスクリプトを実行する。
  5. FontForgeで[Font - Save as Font - WebOpenFormatFont]でwoff保存。
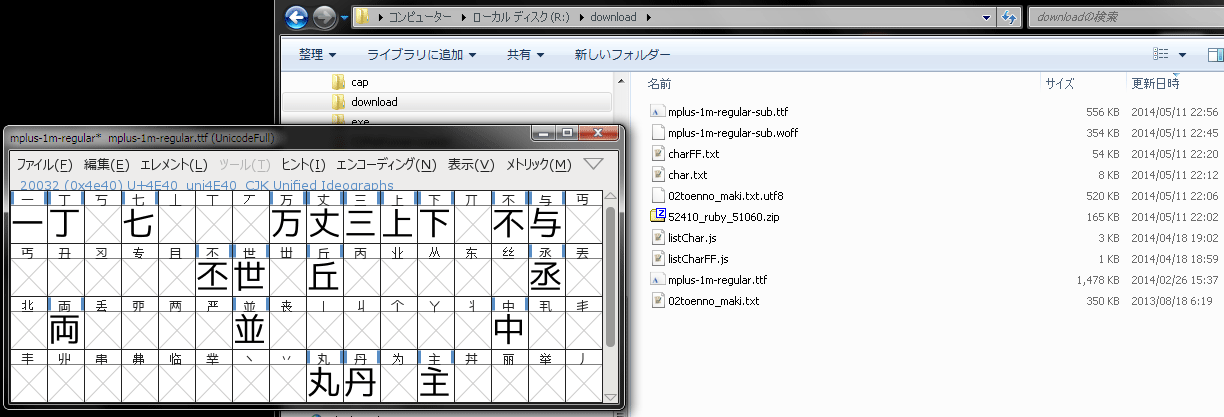

f:id:itouhiro:20140511231150p:plain


具体的な方法

1. 使用したい文字をすべて含んだテキストファイルをUTF-8で保存。

Webフォントに含めたい文字の入った文章を用意します。
ここでは「吉川 英治/三国志 02 桃園の巻」
http://www.aozora.gr.jp/cards/001562/card52410.html
を使ってみます。

そのページの 52410_ruby_51060.zip をダウンロードして展開。
文字コードShift_JISなので、UTF-8に変換して再保存。


2. そのテキストファイルを以下のスクリプト listChar.js に通して、収録文字リストを作成。

node.js http://nodejs.org/をインストールしておいて(ここではWindows版 v0.10.26を使用)、上記の listChar.js を使用。

c:\home> node listChar.js 02toenno_maki.txt.utf8 > char.txt
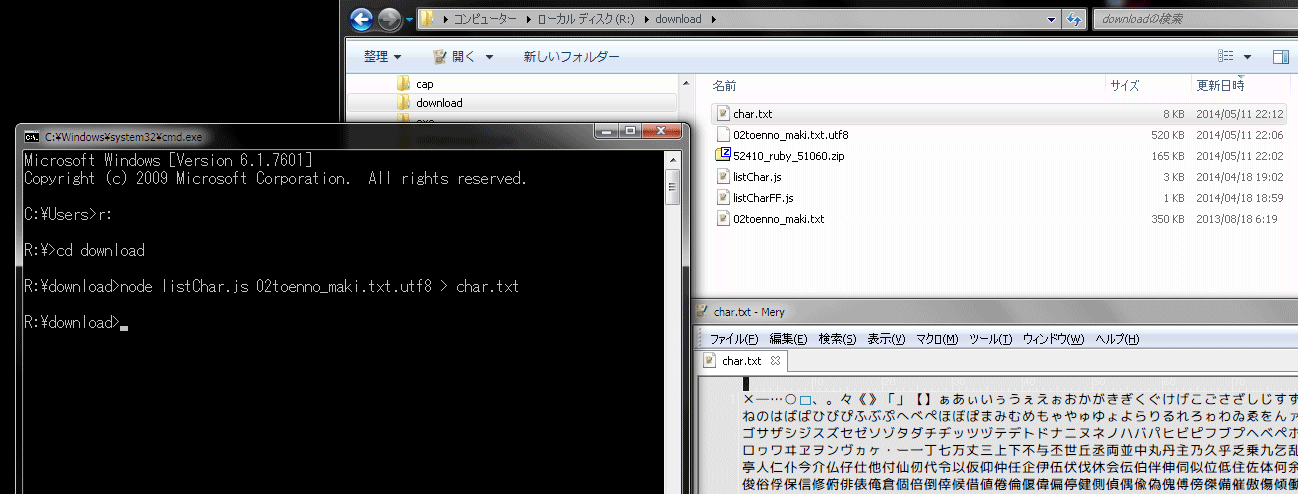
f:id:itouhiro:20140511221727p:plain

生成されたchar.txtは割と大きなファイルになってしまった。

×―…○ 、。々《》「」【】ぁあぃいぅうぇえぉおかがきぎくぐけげこごさざしじすずせぜそぞただちぢっつづてでとどなにぬねのはばぱひびぴふぶぷへべぺほぼぽまみむめもゃやゅゆょよらりるれろゎわゐゑをんァアィイゥウェエォオカガキギクグケゲコゴサザシジスズセゼソゾタダチヂッツヅテデトドナニヌネノハバパヒビピフブプヘベペホボポマミムメモャヤュユョヨラリルレロヮワヰヱヲンヴヵヶ・ー一丁七万丈三上下不与丕世丘丞両並中丸丹主乃久乎乏乗九乞乱乳乾予争事二于云互五井些亜亠亡交享京
‥‥
3. 収録文字リストを、以下のスクリプト listCharFF.js に通して、FontForgeスクリプトを作成。

上記のchar.txtをさらにlistCharFF.jsで加工。

c:\home>node listCharFF.js char.txt > charFF.txt

f:id:itouhiro:20140511222533p:plain

生成されたcharFF.txtはこんな感じ。

SelectWorthOutputting();
SelectFewer(0ud7);
SelectFewer(0u2015);
SelectFewer(0u2026);
SelectFewer(0u25cb);
SelectFewer(0u3000);
SelectFewer(0u3001);
SelectFewer(0u3002);
SelectFewer(0u3005);
SelectFewer(0u300a);
‥‥
4.FontForgeでフォントを読み込み、FontForgeスクリプトを実行する。

FontForge(ここでは http://www.geocities.jp/meir000/fontforge/fontforge-cygwin_2014_01_04.zip を使用)を起動し、フォントファイル(ここでは http://mplus-fonts.sourceforge.jp/mplus-outline-fonts/download/のM+ TESTFLIGHT 058 に含まれる mplus-1m-regular.ttf)を読み込みます。
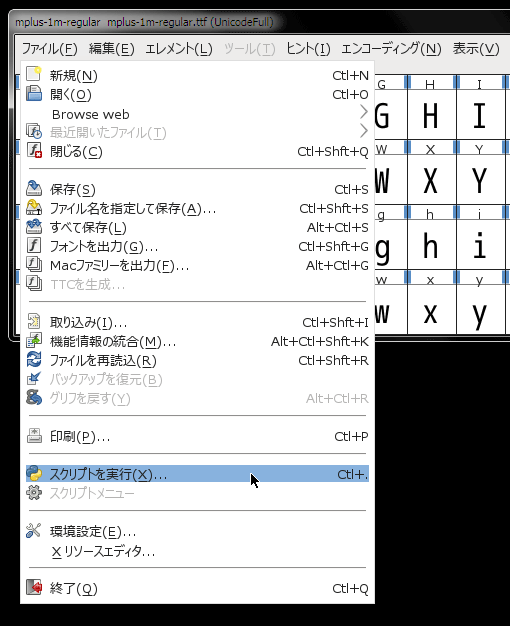
f:id:itouhiro:20140511224201p:plain


[ファイル - スクリプトを実行]で、スクリプト入力画面を出します。[Python]ではなくて[FF]を選択してください。

そして、charFF.txtの中身をコピーして、[右クリック - 貼り付け]します。もし貼り付けできなかったら、もう一度charFF.txtの中身をコピーして[右クリック - 貼り付け]してください。何回かすると貼り付けできます。できたら、[OK]をクリック。30秒ほど待たされました。
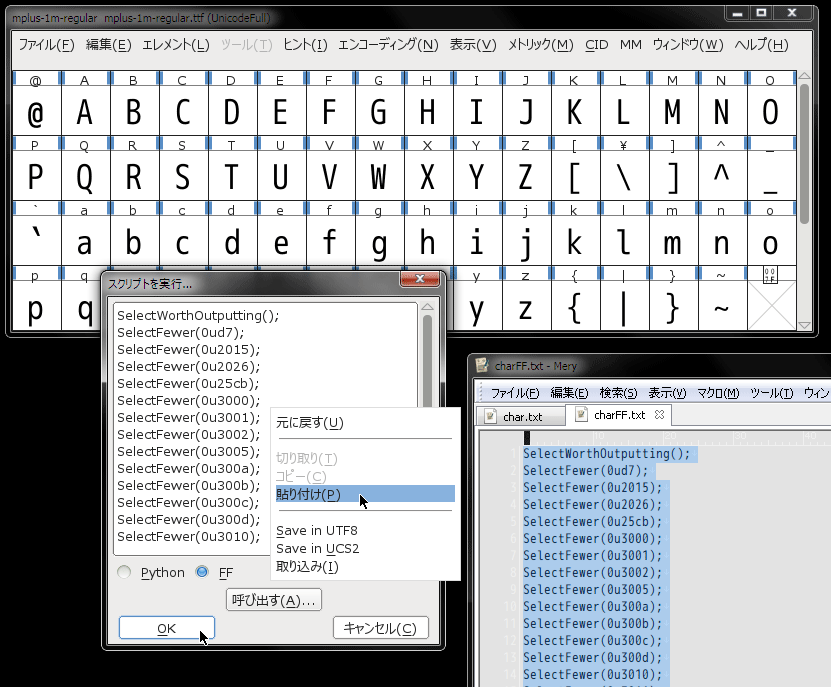
f:id:itouhiro:20140511224319p:plain


5. FontForgeで[Font - Save as Font - WebOpenFont]でwoff保存。

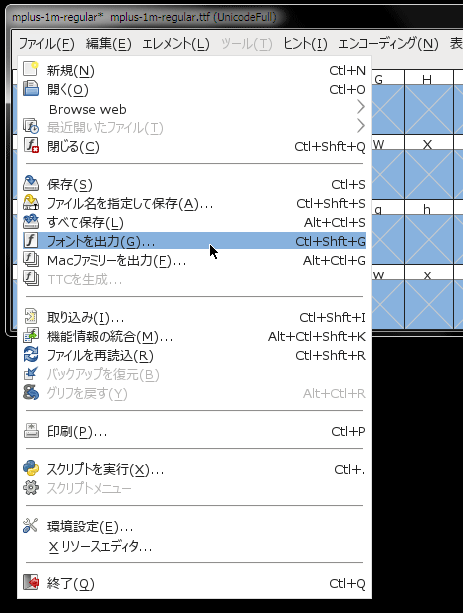
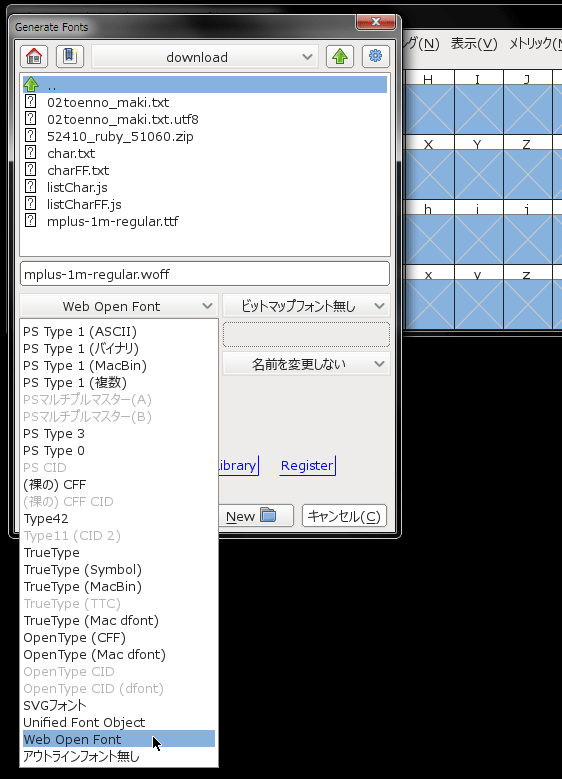
[ファイル - フォントを出力 - Web Open Font - 生成] でwoff保存します。
f:id:itouhiro:20140511224827p:plain
f:id:itouhiro:20140511224905p:plain

何か質問されたら以下のように答えます。
「フォントをこのまま出力しますか?」 → はい
「review the errors or save the font anyway?」 → 生成

これでwoff出力はOK。

ちなみに354KBのファイルになりました。漢字が多いからなー。漢字の少ないテキストであれば、woffファイルのサイズが100KB以下になることもあります。画像を用意するよりサイズ小さくてすみますね。


サイトデザインに差をつける Webフォントコレクション (ijデジタルBOOK)

サイトデザインに差をつける Webフォントコレクション (ijデジタルBOOK)


スクリプト


listChar.js (半角英数字を全角英数字に変換する処理が入っていますので、必要ない場合は「text = changeHankakuZenkaku(text);」の行を削除しましょう)

// usage: $ node listChar.js scenario.txt > char.txt
// テキストファイルに含まれる文字のリストを作る。Webフォントに含める文字をリストアップできる。
// caution: scenario.txt must be 'UTF-8'

//フォントには含めない(除外する)文字
var exclude = '※①②③④⑤⑥⑦⑧⑩⑳●■\uFEFF';


var fs = require('fs');
var text = fs.readFileSync(process.argv[2])+''.replace(new RegExp("\uFEFF",'g'),'');

var changeHankakuZenkaku = function(str){
  var hankaku = ' !"#$%&\'()*+,-./0123456789:;<=>?@ABCDEFGHIJKLMNOPQRSTUVWXYZ[\\]^_`abcdefghijklmnopqrstuvwxyz{|}~';
  var zenkaku = ' !″#$%&′()*+、-。/0123456789:;<=>?@ABCDEFGHIJKLMNOPQRSTUVWXYZ[\]^_‘abcdefghijklmnopqrstuvwxyz{|}~';
  var problemregexp = '!"#$%&\'()*+,-./:;<=>?@[\\]^_`{|}~';
  for (var i=0; i<hankaku.length; i++){
    var s = hankaku.charAt(i);
    for(var j=0; j<problemregexp.length; j++){
      if (problemregexp[j] === s){
        s = '\\' + s; break;
      }
    }
    //console.log('replace:'+s+' -> '+zenkaku.charAt(i));
    str = str.replace(new RegExp(s,'g'), zenkaku.charAt(i));
  }
  return str;
}

var unique = function(array){
  var arr = array.sort();
  if (arr.length <= 0) return [];
  var uniq = [arr[0]];
  for(var i=1; i<arr.length; i++){
    if (arr[i] !== arr[i-1]){
      uniq.push(arr[i]);
    }
  }
  return uniq;
};

//全角のひらがな・カタカナ・英数字を全部含める
text += ' ぁあぃいぅうぇえぉおかがきぎくぐけげこごさざしじすずせぜそぞただちぢっつづてでとどなにぬねのはばぱひびぴふぶぷへべぺほぼぽまみむめもゃやゅゆょよらりるれろゎわゐゑをんァアィイゥウェエォオカガキギクグケゲコゴサザシジスズセゼソゾタダチヂッツヅテデトドナニヌネノハバパヒビピフブプヘベペホボポマミムメモャヤュユョヨラリルレロヮワヰヱヲンヴヵヶABCDEFGHIJKLMNOPQRSTUVWXYZabcdefghijklmnopqrstuvwxyz0123456789';

text = changeHankakuZenkaku(text);
//console.log(str+"\n"+"\n"+"\n");


var chars = [];
for (var i=0; i<text.length; i++){
  var c = text.charAt(i);
  chars.push(c);
}

uniqchars = unique(chars);

var result = '';
for (var i=0; i<uniqchars.length; i++){
  if (uniqchars[i].charCodeAt(0) < 128) continue; //改行コードと半角英数字は含めない
  var hasExclude = false;
  for (var j=0; j<exclude.length; j++){
    if (exclude.charAt(j) === uniqchars[i]) hasExclude = true;
  }
  if ( ! hasExclude) result += uniqchars[i];
}

console.log(result);

listCharFF.js

// usage: $ node listCharFF.js char.txt > charFF.txt
// テキストファイルに含まれる文字だけ残したWebフォントを作るためのFontForgeスクリプトを生成する
// caution: char.txt = output of listChar.js

var fs = require('fs');
var text = fs.readFileSync(process.argv[2])+''.replace(new RegExp("\uFEFF",'g'),'');

var unique = function(array){
  var arr = array.sort();
  if (arr.length <= 0) return [];
  var uniq = [arr[0]];
  for(var i=1; i<arr.length; i++){
    if (arr[i] !== arr[i-1]){
      uniq.push(arr[i]);
    }
  }
  return uniq;
};

var chars = [];
for (var i=0; i<text.length; i++){
  var c = text.charAt(i);
  chars.push(c);
}

uniqchars = unique(chars);

var result = 'SelectWorthOutputting();\n';
for (var i=0; i<uniqchars.length; i++){
  if (uniqchars[i].charCodeAt(0) < 128) continue; //改行コードと半角英数字は含めない
  result += 'SelectFewer(0u'+uniqchars[i].charCodeAt(0).toString(16)+');\n';
}
result += 'DetachAndRemoveGlyphs();';
console.log(result);




Unityで外部ファイルの読み書き(JavaScript)

$
0
0

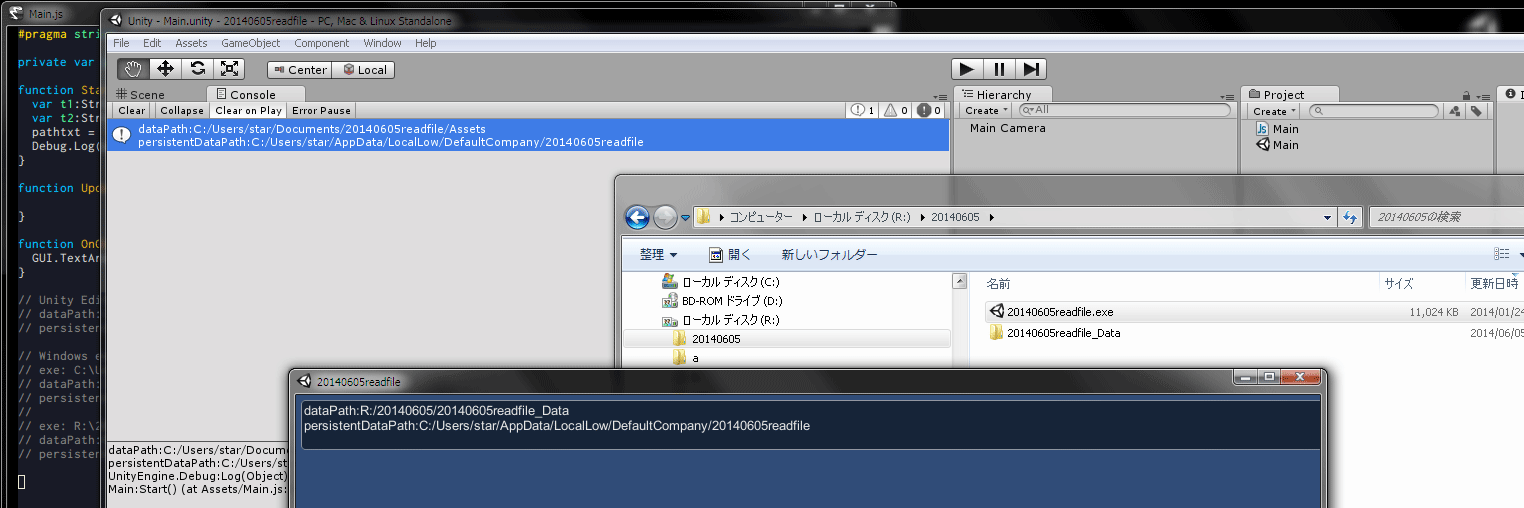
「Unityで外部ファイルの読み書き(C#)」 http://itouhiro.hatenablog.com/entry/20130826/unityJavaScript版。
f:id:itouhiro:20140605170247p:plain

#pragma strict

private var pathtxt:String = '';

function Start () {
  var t1:String = Application.dataPath;
  var t2:String = Application.persistentDataPath;
  pathtxt = 'dataPath:'+t1+"\npersistentDataPath:"+t2;
  Debug.Log(pathtxt);
}

function Update () {

}

function OnGUI(){
  GUI.TextArea(new Rect(5,5,Screen.width,50), pathtxt);
}

// Unity Editor:
// dataPath:C:/Users/star/Documents/20140605readfile/Assets
// persistentDataPath:C:/Users/star/AppData/LocalLow/DefaultCompany/20140605readfile

// Windows exe
// exe: C:\Users\star\Documents\20140605readfile\20140605readfile.exe
// dataPath:C:/Users/star/Documents/20140605readfile/20140605readfile_Data
// persistentDataPath:C:/Users/star/AppData/LocalLow/DefaultCompany/20140605readfile
//
// exe: R:\20140605\20140605readfile.exe
// dataPath:R:/20140605/20140605readfile_Data
// persistentDataPath:C:/Users/star/AppData/LocalLow/DefaultCompany/20140605readfile

なるほど、exeファイルの位置を変更すると、dataPathは位置が変わるけど、persistentDataPathは変わらないな。


f:id:itouhiro:20140605183952p:plain

#pragma strict
import System.IO; //FileInfo, StreamWriter, StreamReader

private var outputFilename:String = 'a.txt';

function Start () {
  var guitxt:String = '';
  guitxt = readFile('');
  writeFile(guitxt);
}

function Update () {

}

function writeFile(outputStr:String):void {
  var fi:FileInfo = new FileInfo(Application.dataPath +'/'+ outputFilename);
  // using (var sw:StreamWriter = fi.AppendText()){
  //   sr.WriteLine(guitxt);
  // }
  var sw:StreamWriter = fi.AppendText();
  sw.WriteLine(outputStr);
  sw.Close();
}

function readFile(inputStr:String):String {
  var fi:FileInfo = new FileInfo(Application.dataPath +'/'+ outputFilename);
  var sr:StreamReader = new StreamReader(fi.OpenRead());
  while( ! sr.EndOfStream){
    inputStr += sr.ReadLine();
  }
  inputStr += SetDefaultTxt();
  sr.Close();
  return inputStr;
}

function SetDefaultTxt():String{
  return 'NotC#,ButJSあ\n';
}

'a.txt'は最初に作っておく必要がある。
ファイル読み書きちゃんとできてる。


しかし本物のJavaScriptとはずいぶん変わってる。

  • JavaScriptなら"use strict"と書くところを#pragma strictだし
  • ファイル読み書きなんて.NetすぎてC#書くのと変わらない
  • 静的型付けはActionScript3に似てるけど、配列の扱いとか違うし

うーん、やはりC#使う方が素直だよなー、Unityの場合。


Unity4ゲームコーディング 本当にゲームが作れるスクリプトの書き方

Unity4ゲームコーディング 本当にゲームが作れるスクリプトの書き方

Unity 4.3+NGUI 3.6で台詞表示ウィンドウの簡単なサンプル

$
0
0

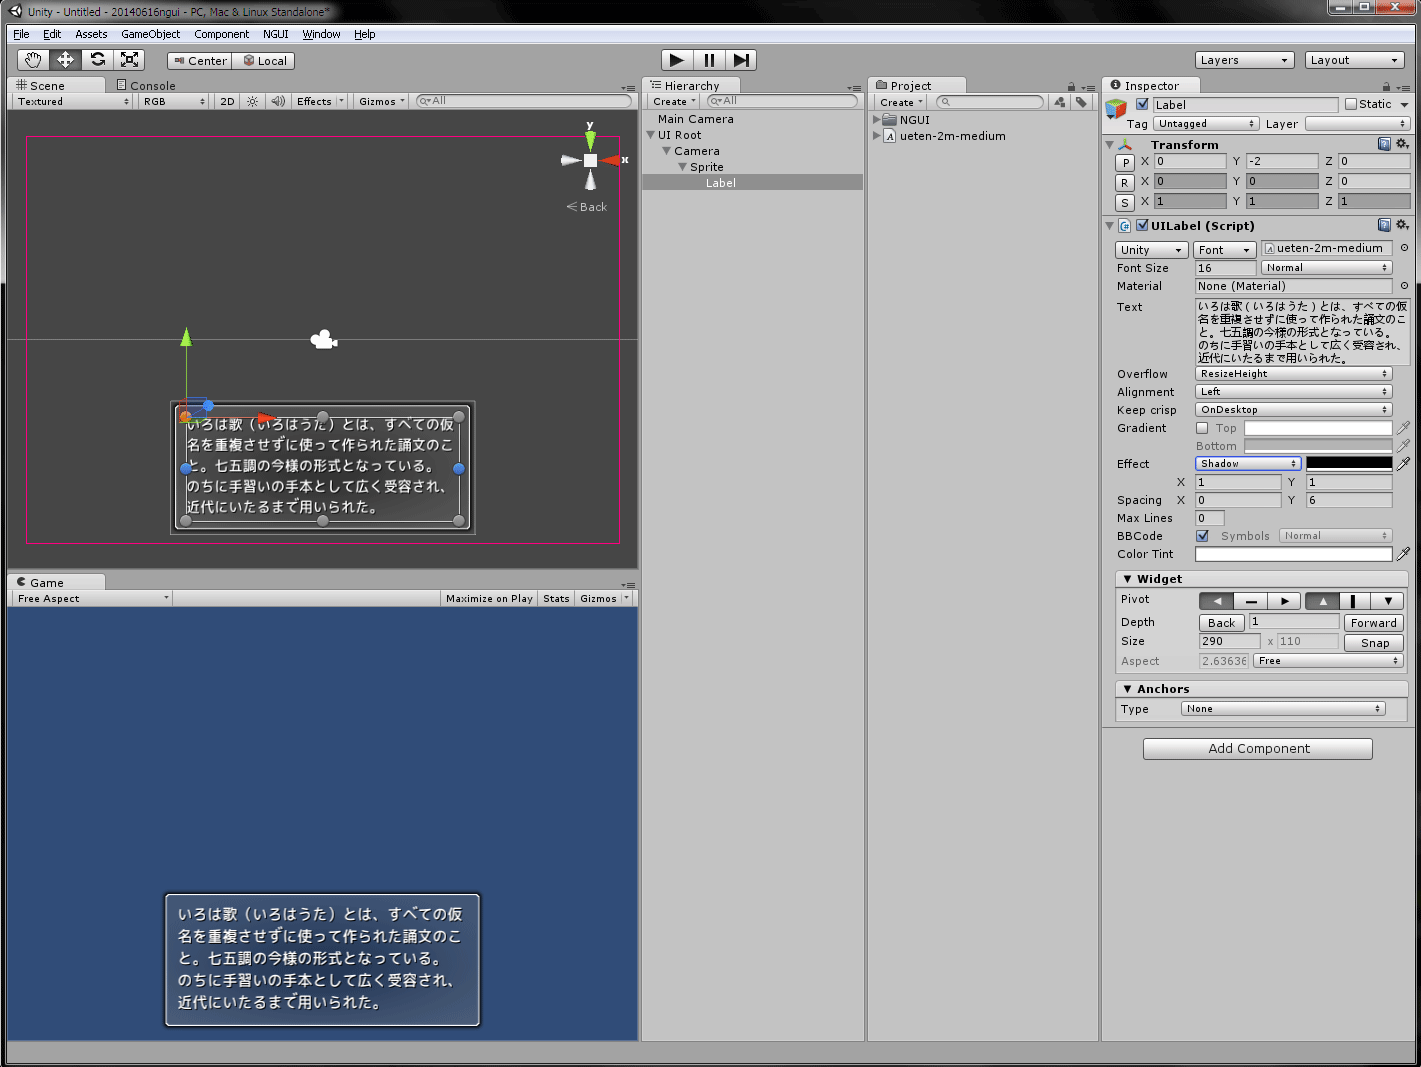
Unity+NGUIで台詞表示ウィンドウの簡単なサンプル
f:id:itouhiro:20140616160542p:plain

環境

手順

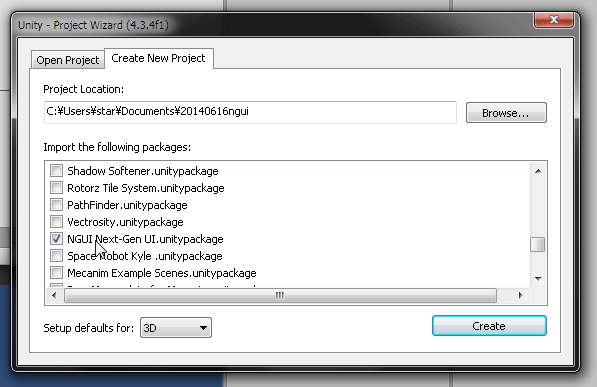
  1. [File - New Project]で NGUIをチェックして、新規プロジェクト作成。f:id:itouhiro:20140616064215p:plain
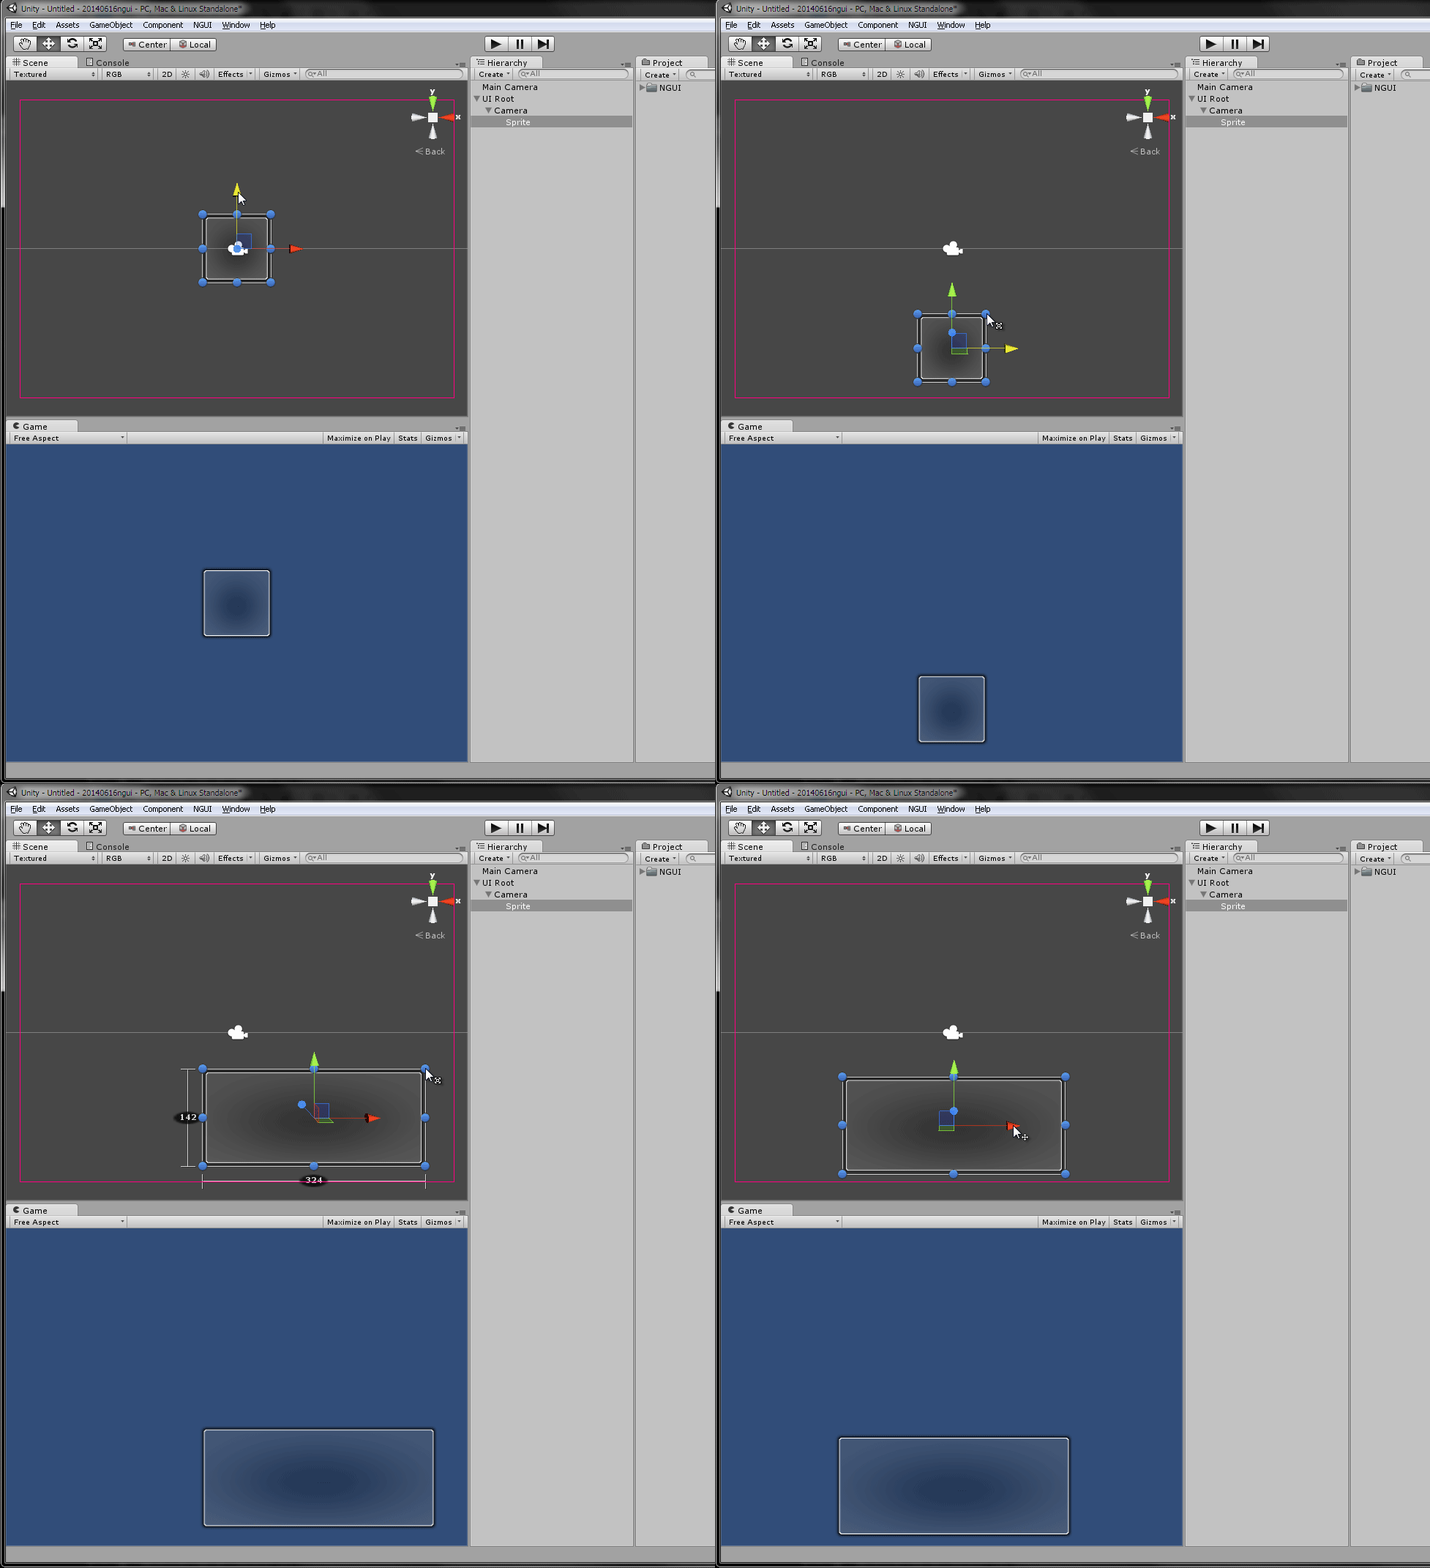
  2. [NGUI - Create - 2D UI]とする。Hierarchy領域に UI Rootが生成される。NGUIのオブジェクトはこの UI Root - Camera の下に配置しなさい。f:id:itouhiro:20140616070038p:plain
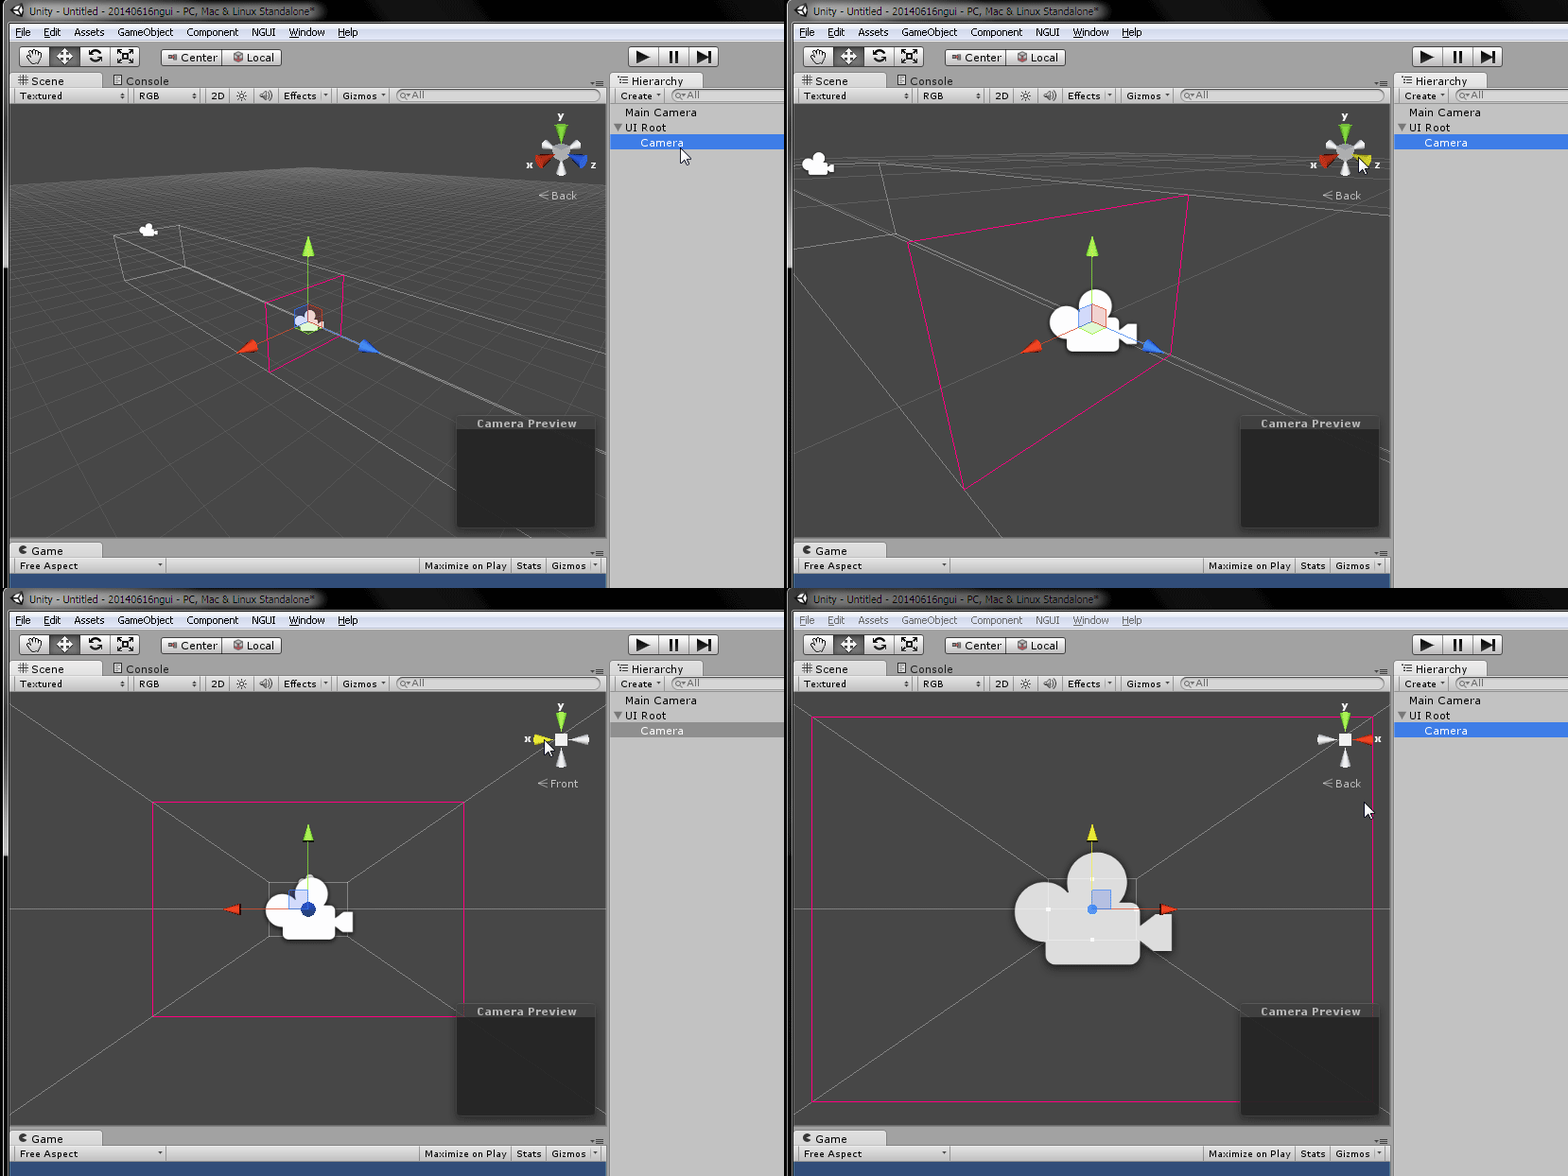
  3. Hierarchy領域で、UI Root - Camera を選択する。この枠線がゲームするときにUIとして表示される領域。
  4. この枠線がScene領域に正面から表示されるように、Scene領域のXYZを(ドラッグじゃなくて)クリック。マウスホイールを回転させて、なるべく大きめに枠線を表示。f:id:itouhiro:20140616065250g:plain
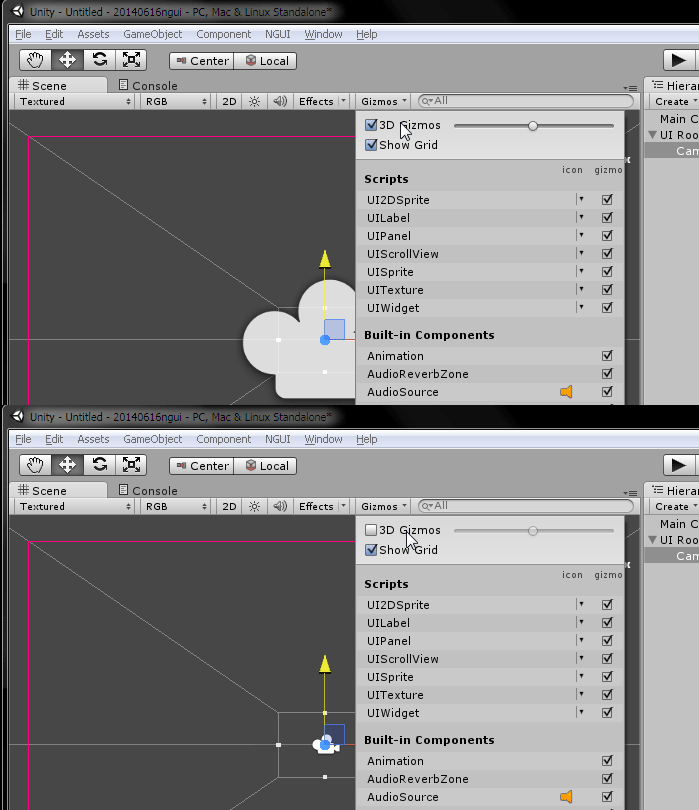
  5. Scene領域の[Gizmos- 3D Gizmos]をOFFにする。邪魔なカメラアイコンが表示されなくなる。f:id:itouhiro:20140616065817g:plain
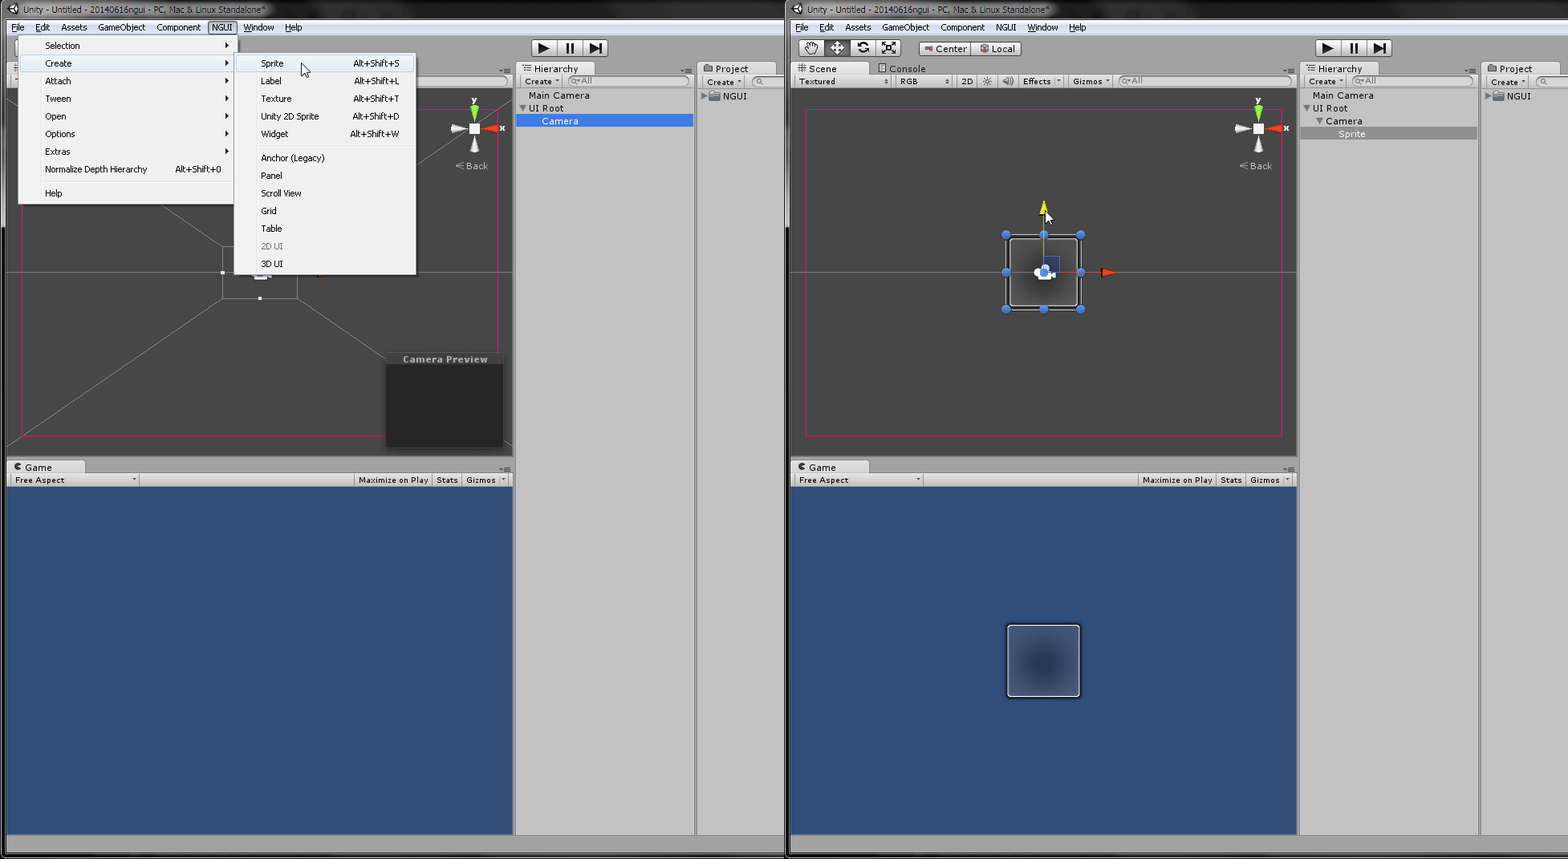
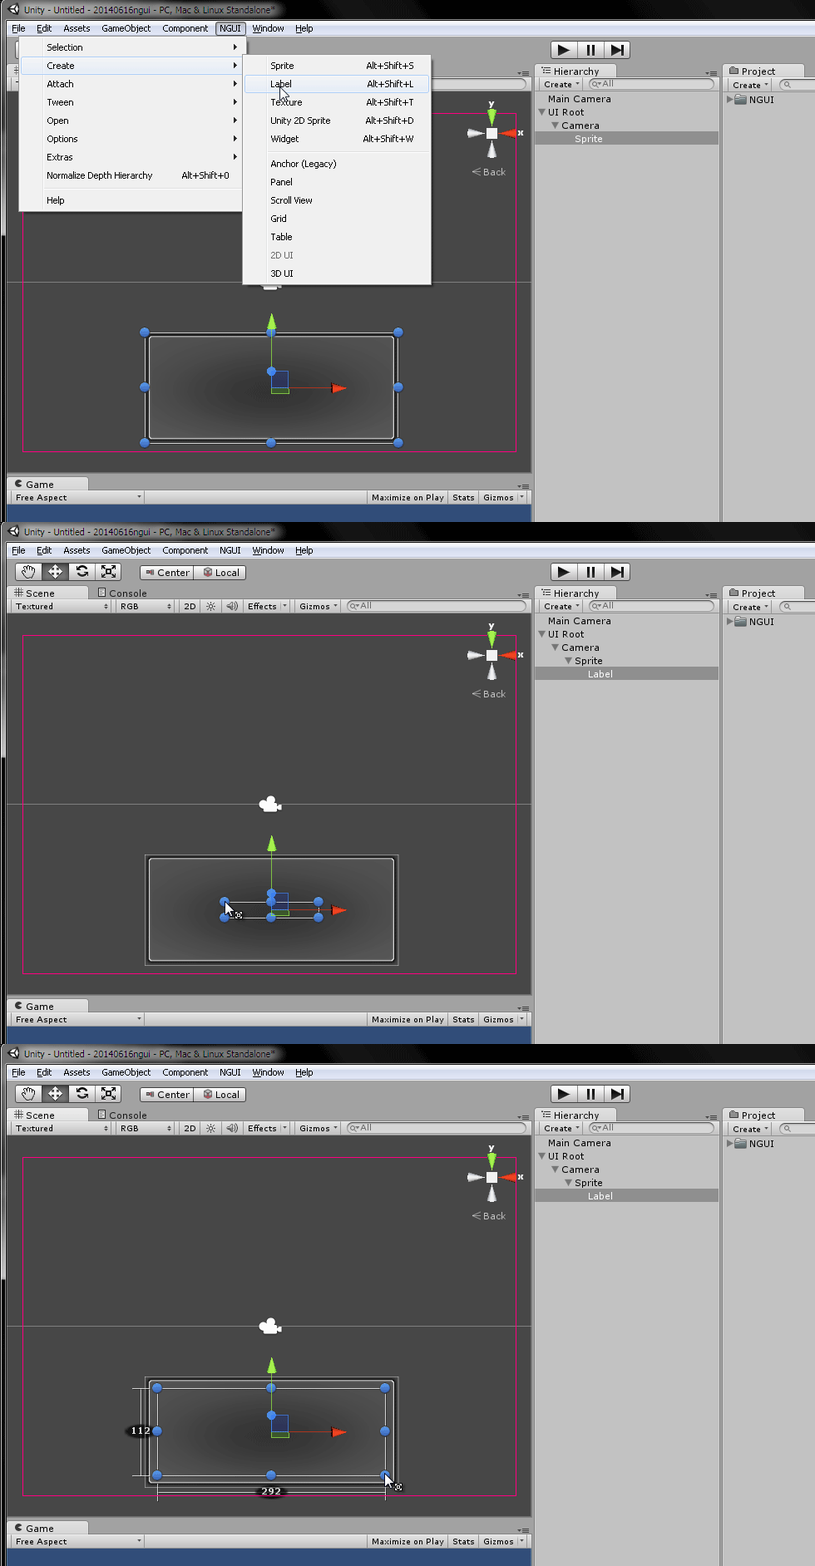
  6. Hierarchy領域で、UI Root - Camera を選択して、[NGUI - Craete - Sprite]でウインドウみたいなのを表示。f:id:itouhiro:20140616071441g:plain
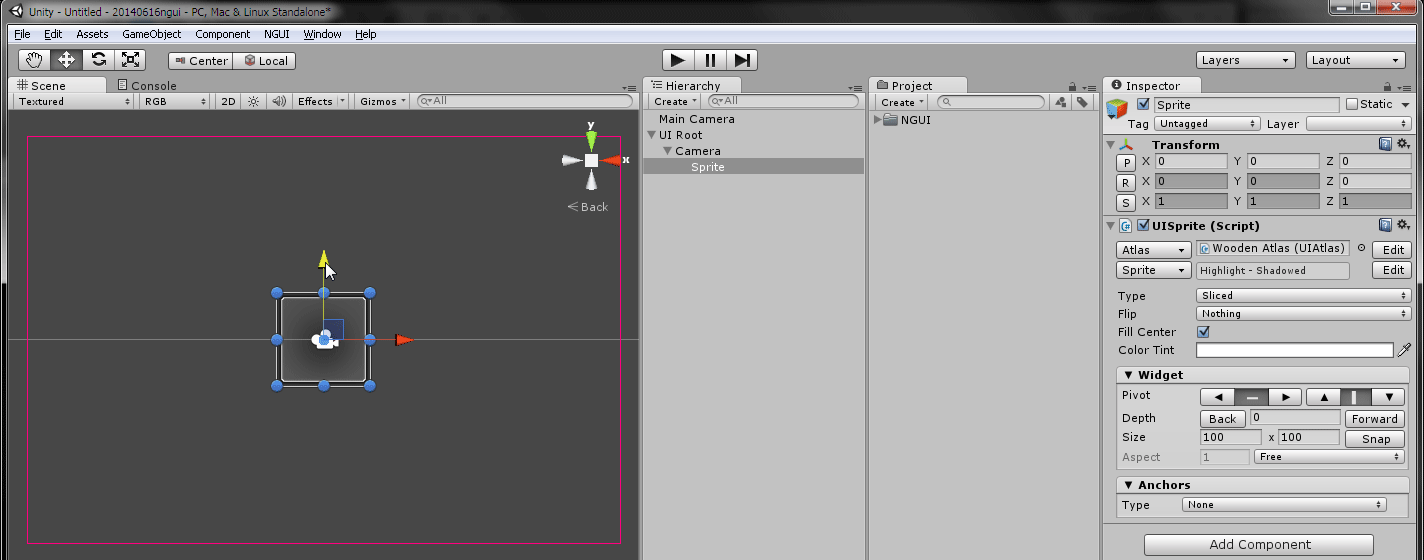
  7. Hierarchy領域で、UI Root - Camera - Sprite を選択して、Inspector領域のUISprite(Script) - [Atlas] が Wooden Atlas になっていることを確認。なってなければ、UISprite(Script) - [Atlas]ボタンをクリックしてWooden Atlasを選択。操作まちがえたら、Hierarchy領域で、UI Root - Camera - Sprite を選択すればいい。
  8. Hierarchy領域で、UI Root - Camera - Sprite を選択して、Inspector領域のUISprite(Script) - [Sprite]ボタン(Editボタンではない)をクリックして[Hilight - shadowed]を選択。f:id:itouhiro:20140616071031p:plain
  9. Scene領域でウィンドウを拡大する(引き伸ばす)。f:id:itouhiro:20140616071500g:plain
  10. Hierarchy領域で、UI Root - Camera - Sprite を選択して、[NGUI - Craete - Label]で文字表示領域を作成。f:id:itouhiro:20140616072016g:plain
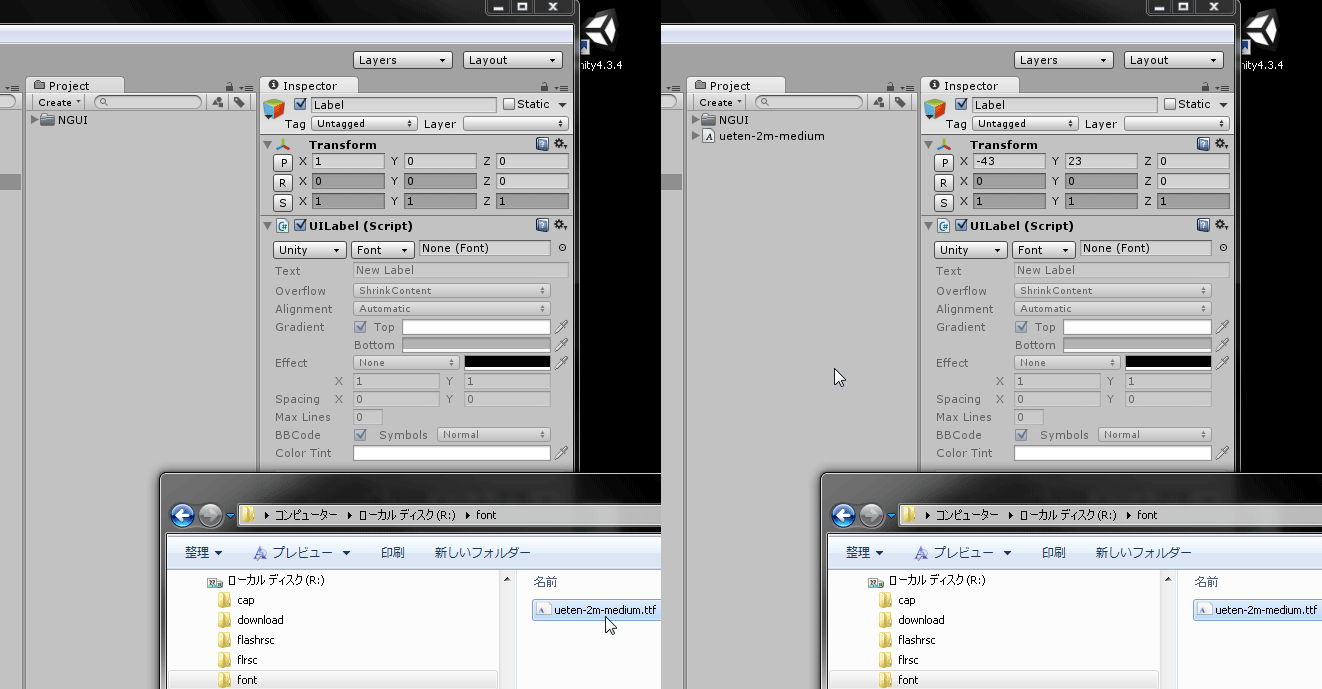
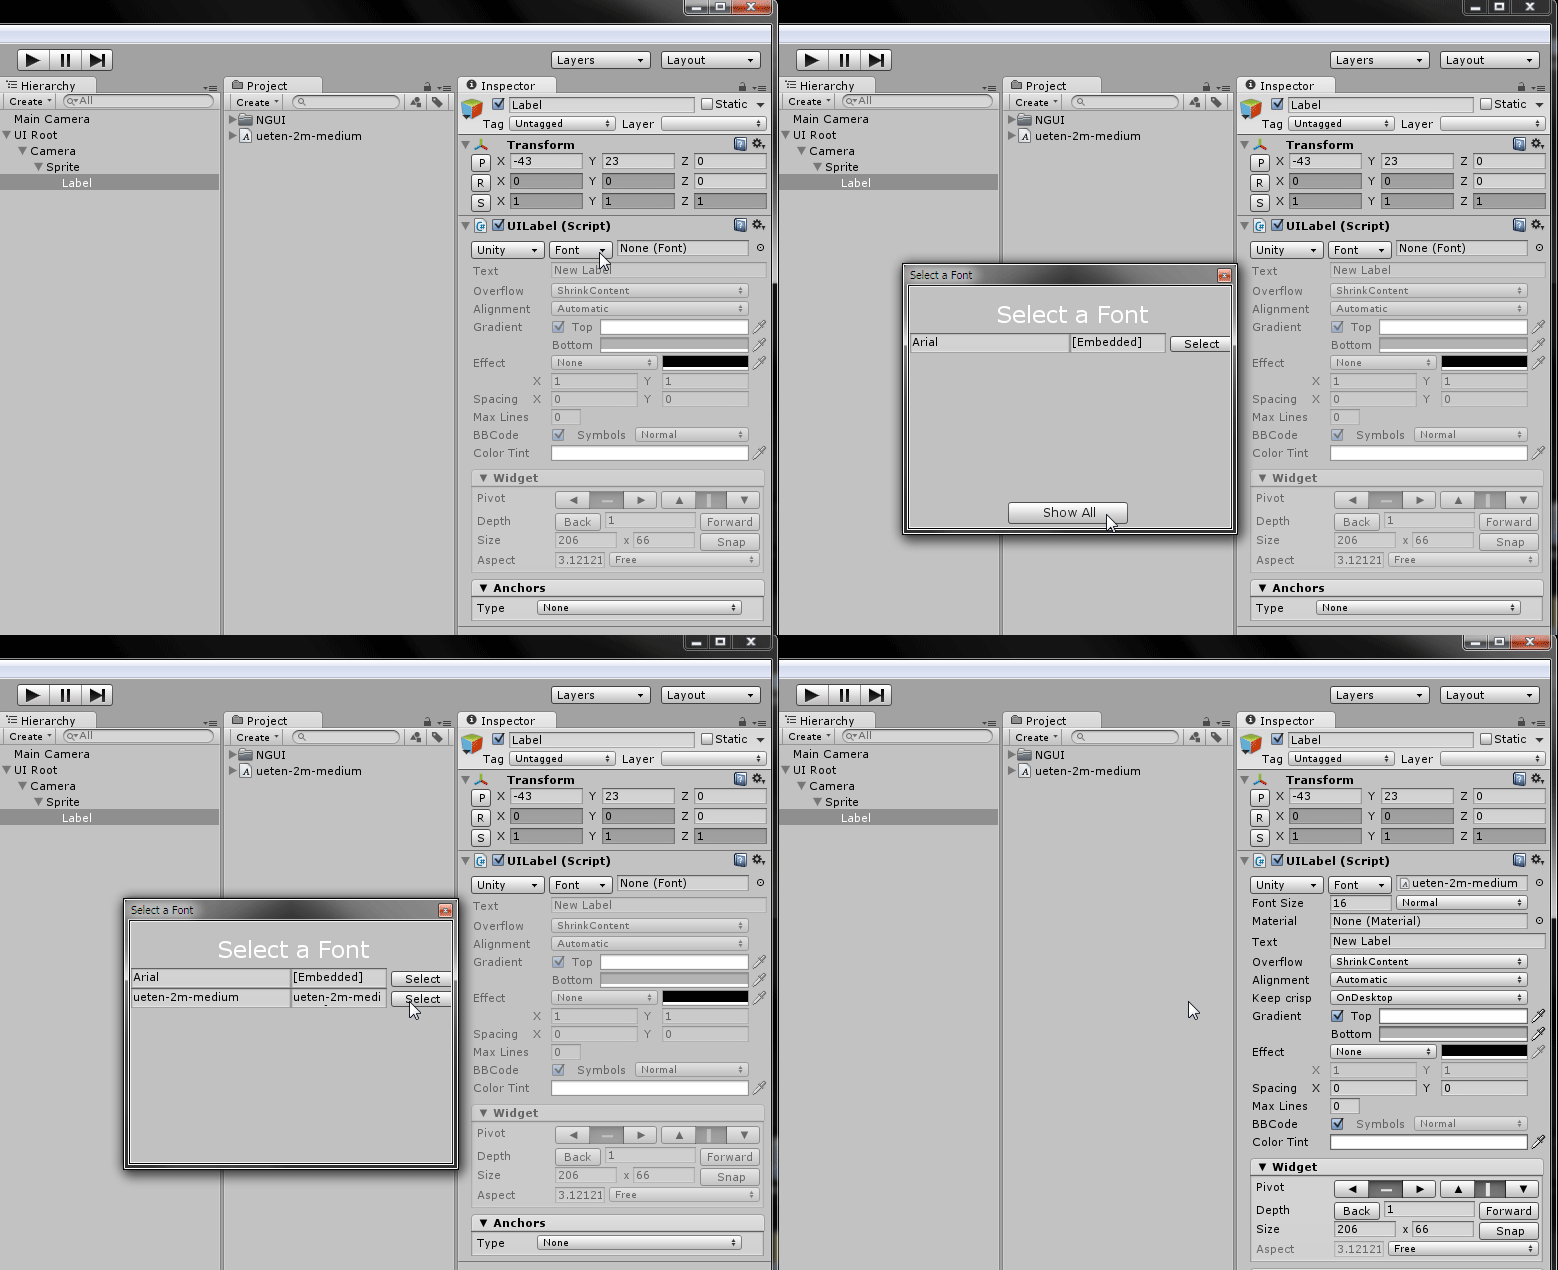
  11. フォントを指定しないと文字入力できない。WindowsのExplorerで*.ttfを選択して、Hierarchy領域にD&D。Hierarchy領域で、UI Root - Camera - Sprite - Label を選択して、Inspector領域のUILabel(Script) - [Font]ボタンをクリックして、*.ttfを選択。f:id:itouhiro:20140616075521g:plainf:id:itouhiro:20140616075625g:plain
  12. Hierarchy領域で、UI Root - Camera - Sprite - Label を選択して、Inspector領域のUILabel(Script) - Textに文字を入力。漢字と改行含む日本語文を入力する。OverflowでShrink..だと勝手に文字を大きさを変えるのでResizeHeightにする。Widget - PivotでTOP矢印とLEFT矢印を選択する。Spacingで行間あけて、AlignmentでLeftにする。Effectでshadow指定すると文字表示がしまるかも。GradientはOFFのほうが文字読みやすいかも。f:id:itouhiro:20140616094900p:plain
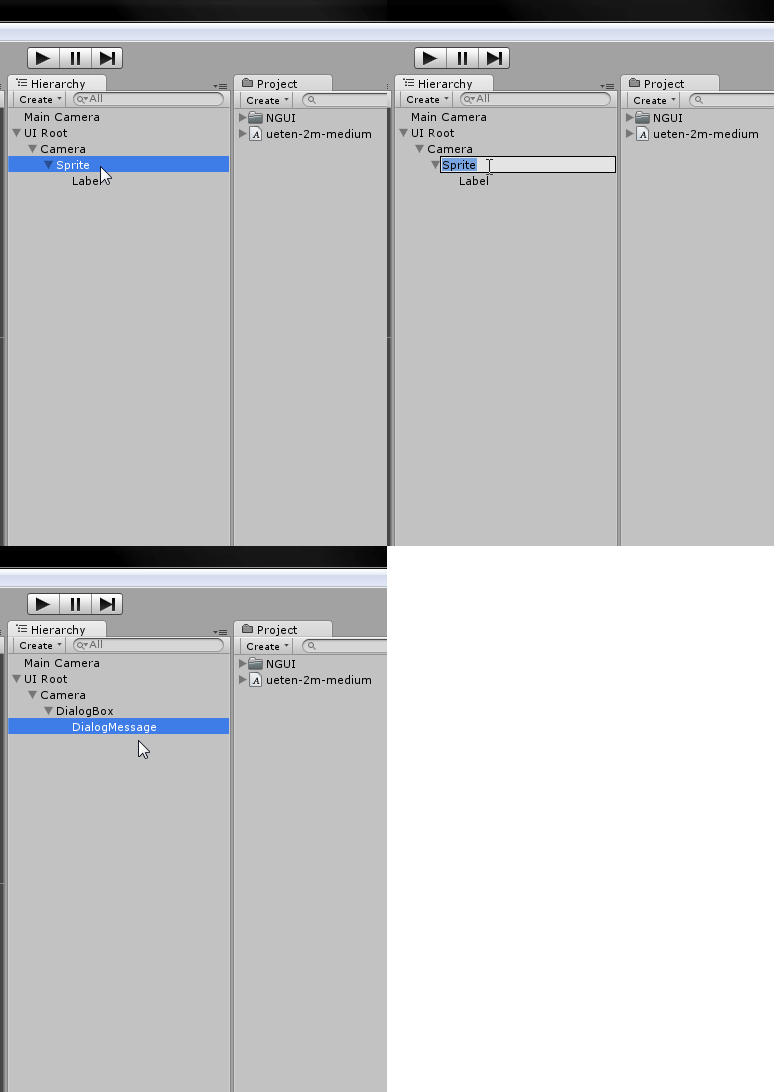
  13. Hierarchy領域で、UI Root - Camera - Spriteを選択して、[F2]キーおしてLabelをDialogBoxにrenameする。UI Root - Camera - Sprite - Label を選択して、[F2]キーおしてDialogMessageにrenameする。f:id:itouhiro:20140616095406g:plain
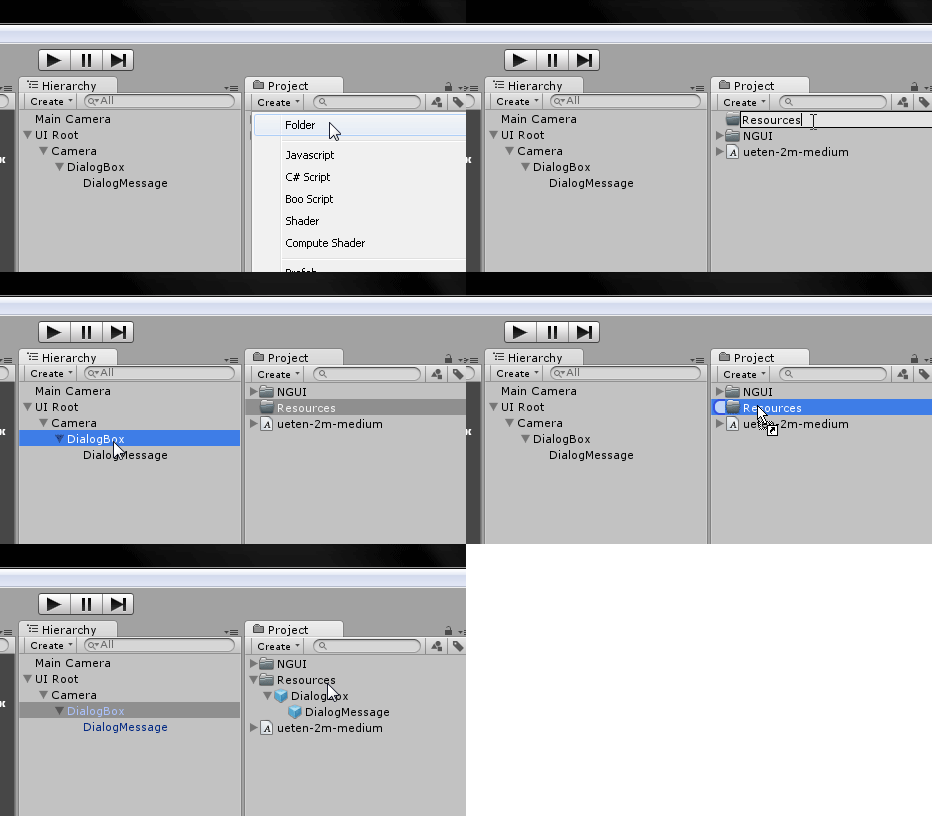
  14. Project領域で[Create - Folder]して Resources というフォルダーを作成。Hierarchy領域で、UI Root - Camera - Spriteを選択して、Project領域のResourcesフォルダーにD&Df:id:itouhiro:20140616080413g:plain
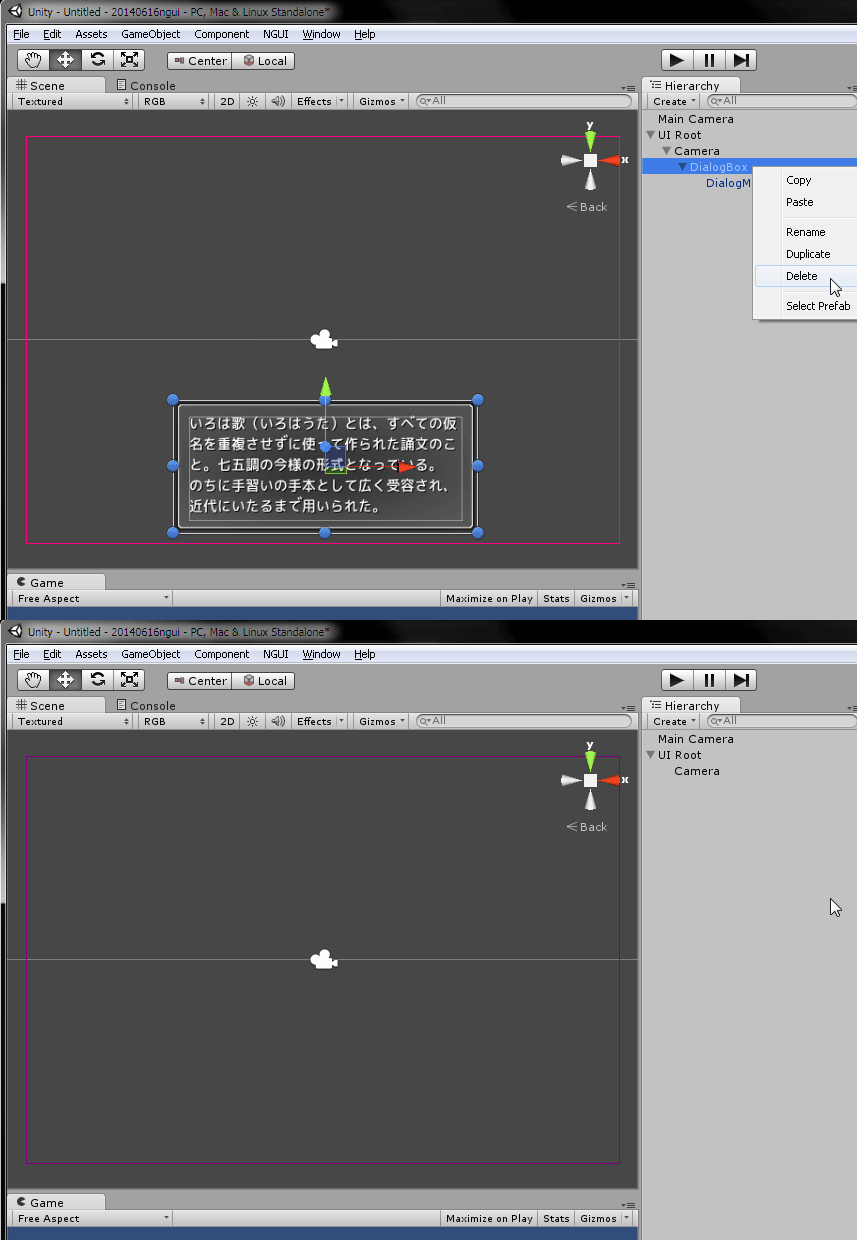
  15. Hierarchy領域で、UI Root - Camera - Sprite を選択して削除。f:id:itouhiro:20140616080620g:plain
  16. Project領域で[Create - C#Script]して GameController というファイルを作成。
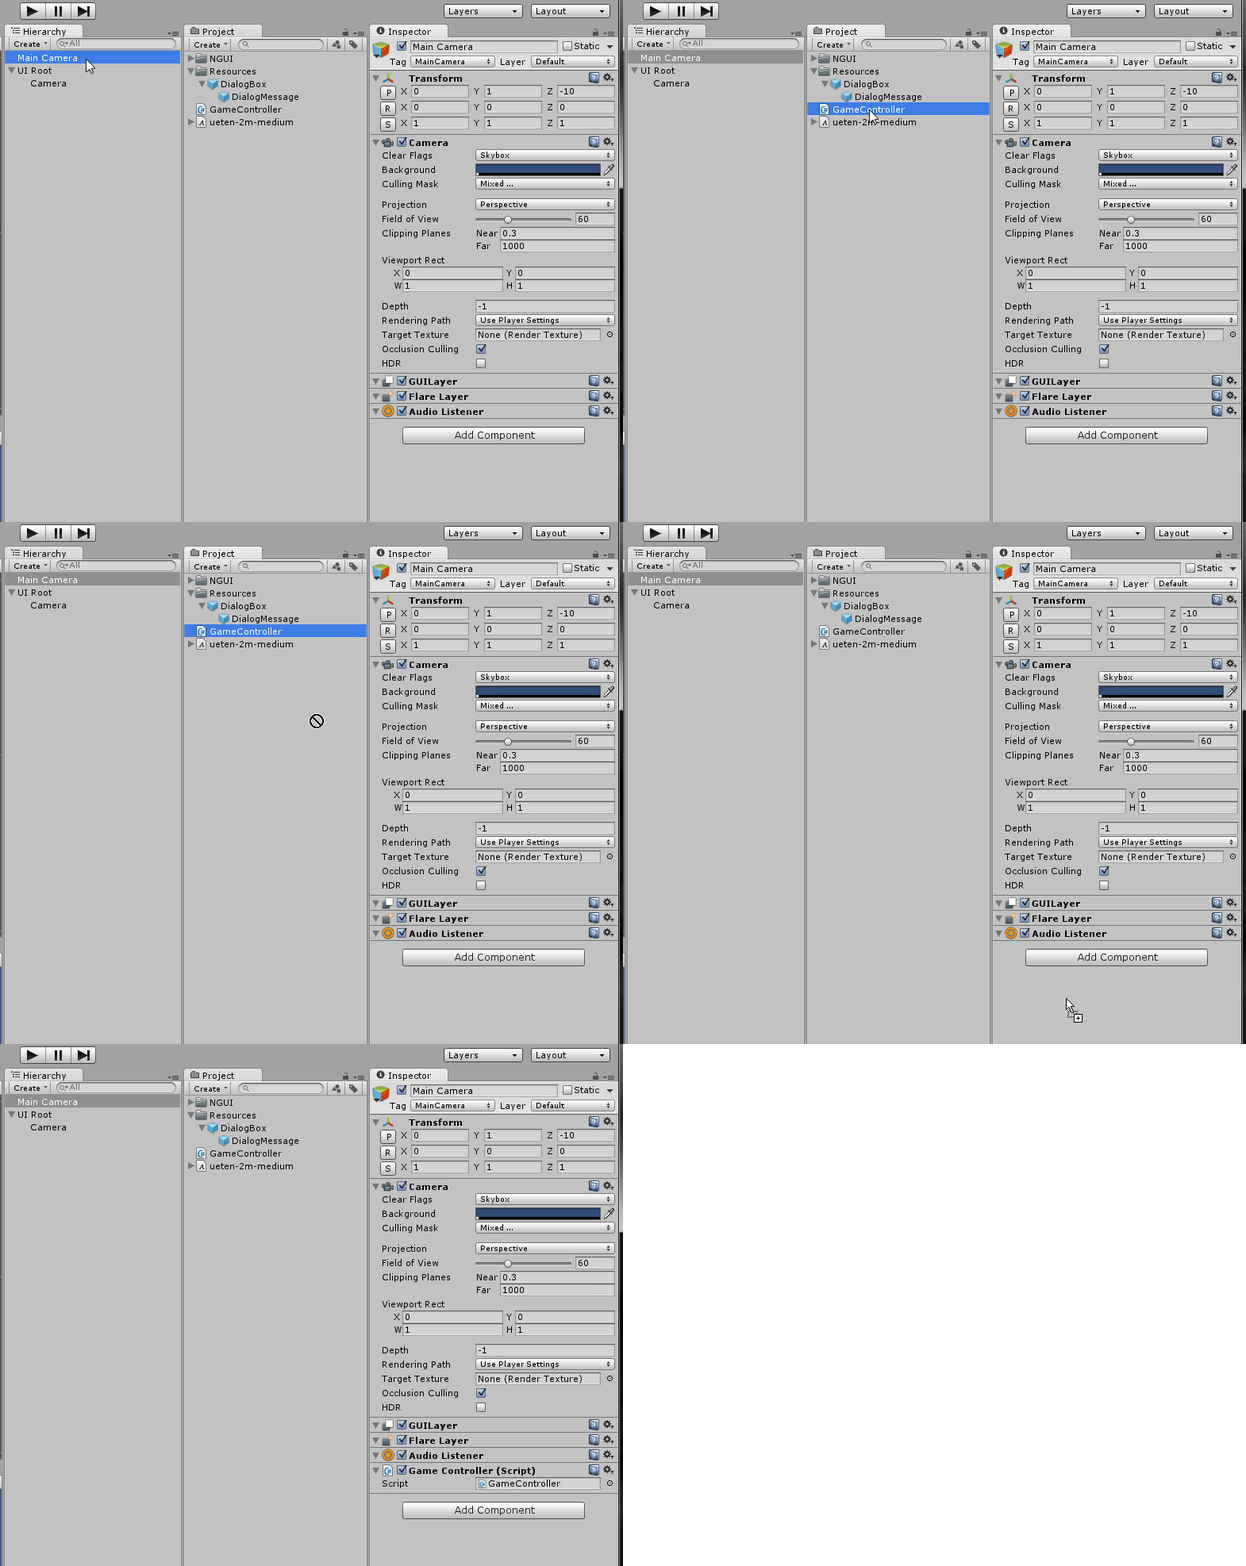
  17. スクリプトは、なにかのオブジェクトと結びつければ実行される。ここではMain Cameraと結びつけることにする。Hierarchy領域でMain Cameraを選択。Inspector領域にMainCameraの情報が表示される。ここに、Project領域のGameControllerを選択してD&Df:id:itouhiro:20140616084032g:plain
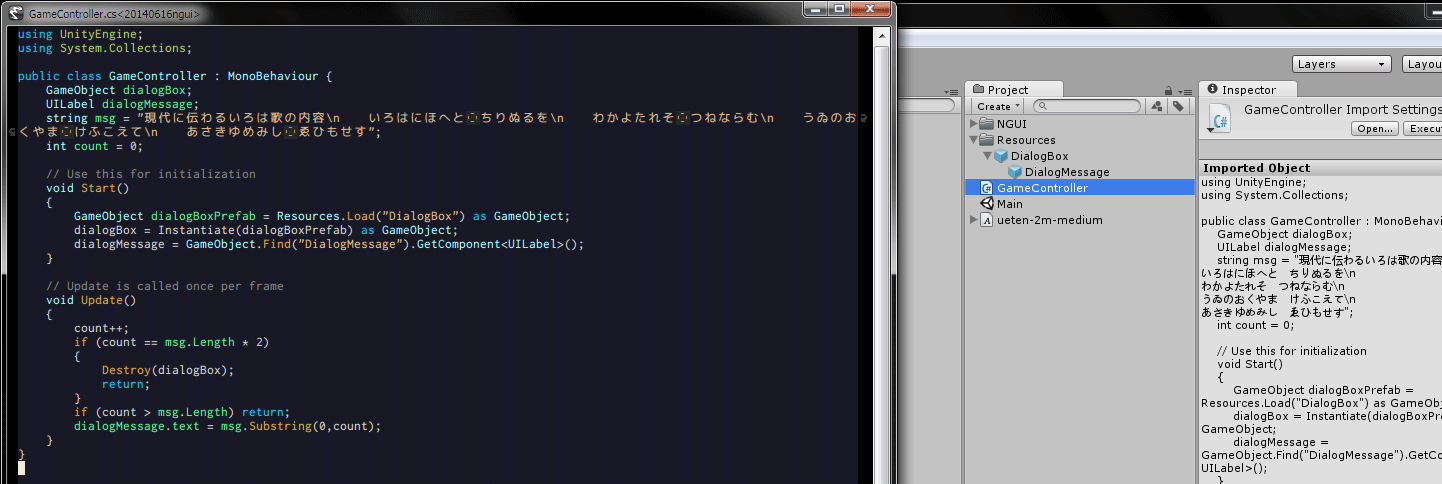
  18. Project領域のGameControllerをダブルクリックして編集する。(ソースコードは最下部に掲載)f:id:itouhiro:20140616095835p:plain
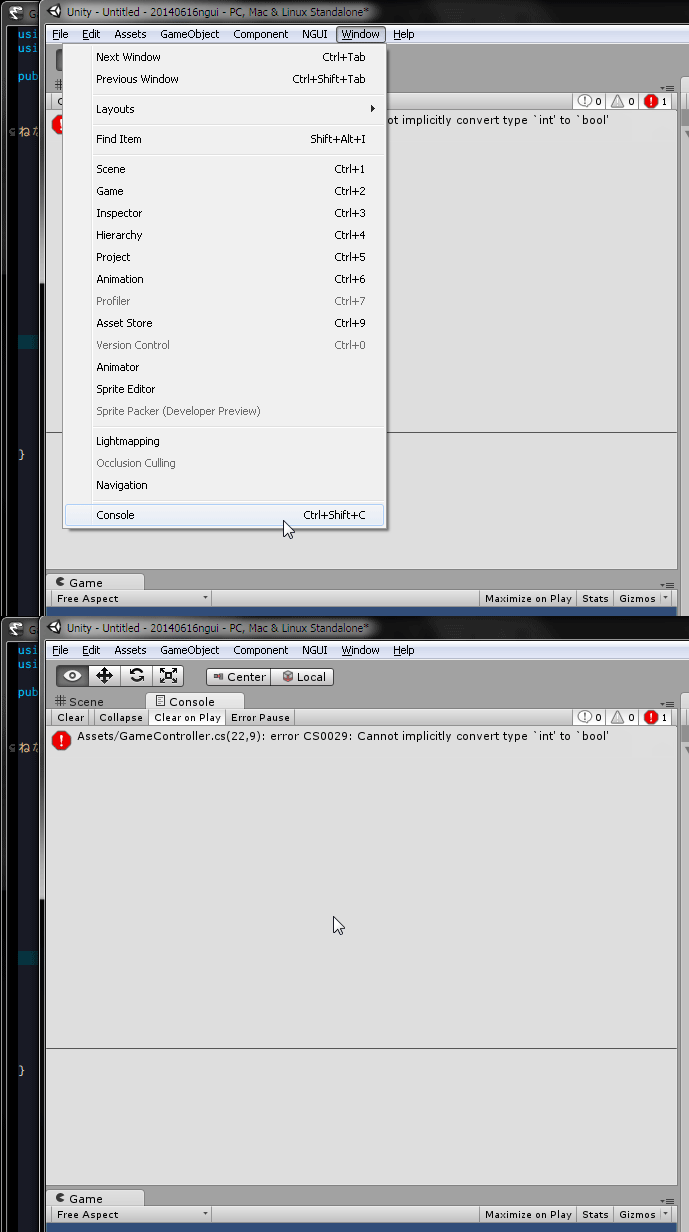
  19. 入力したソースコードにまちがいがある場合、Consoleウィンドウに表示される。Consoleウィンドウは[Window - Console]で出現する。f:id:itouhiro:20140616085214g:plain
  20. [実行]ボタンをクリックして、動作を確認する。f:id:itouhiro:20140616095814p:plain
  21. [File - Save Scene]で Main などと名前をつけて保存する。


ソースコード GameController.cs

using UnityEngine;
using System.Collections;

public class GameController : MonoBehaviour {
    GameObject dialogBox;
    UILabel dialogMessage;
    string msg = "現代に伝わるいろは歌の内容\n    いろはにほへと ちりぬるを\n    わかよたれそ つねならむ\n    うゐのおくやま けふこえて\n    あさきゆめみし ゑひもせす";
    int count = 0;

    // Use this for initialization
    void Start()
    {
        GameObject dialogBoxPrefab = Resources.Load("DialogBox") as GameObject;
        dialogBox = Instantiate(dialogBoxPrefab) as GameObject;
        dialogMessage = GameObject.Find("DialogMessage").GetComponent<UILabel>();
    }

    // Update is called once per frame
    void Update()
    {
        count++;
        if (count == msg.Length * 2)
        {
            Destroy(dialogBox);
            return;
        }
        if (count > msg.Length) return;
        dialogMessage.text = msg.Substring(0,count);
    }
}


f:id:itouhiro:20140616160852j:plain
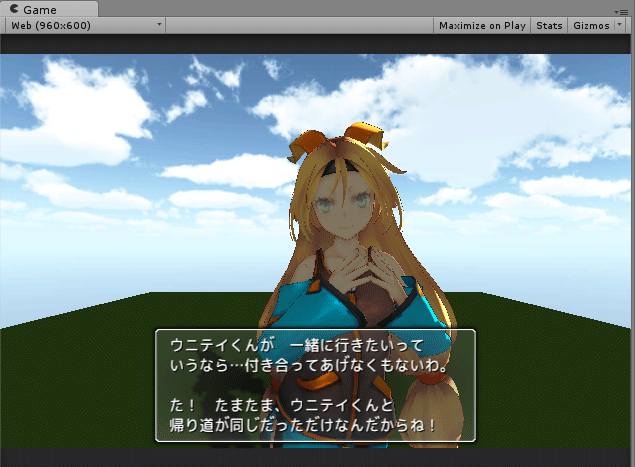
3Dキャラクターは「Unity-Chan http://unity-chan.com/」です。


ゲーム作りのはじめかた Unityで覚える企画からレベルデザインまで

ゲーム作りのはじめかた Unityで覚える企画からレベルデザインまで

Arch Linux 2014.07.03 インストール

$
0
0

Debian6の上で動作する、VirtualBox 4.3.14内で、Arch Linux 2014.07.03 をインストールしました。その記録。

手順は
http://note.chiebukuro.yahoo.co.jp/detail/n267693
を参考にしました。


基本システムをインストール

まずは 558MBのisoファイルをダウンロード。

f:id:itouhiro:20140730085303p:plain
f:id:itouhiro:20140730085511p:plain


VirtualBoxで仮想ディスクを作成し、isoをセット([Setting - Storage - Empty - CD/DVD drive - Choose a virtual CD/DVD file..])して、起動。設定は[メモリ 512MB, HDD 40GB, Audioなし] あとはデフォルトです。
f:id:itouhiro:20140730194818p:plain


Linuxのインストールは一般的には簡単なのですが、Arch Linuxは難しい感じです。それはインストール領域(パーティション)を自分で指定する必要があるから。


cfdiskを使います。
f:id:itouhiro:20140730090225p:plain

swap /dev/sda1
linux /dev/sda2

の2パーティションを作成します。
まずswap領域を 1 GBで作成。[New → Primary → 1024 → End → Type → 82]
残りの領域を linuxに割り当て。 [New → Primary → Enter → Beginning → Bootable] (このBeginning → Bootableはやらなくてよいかも。というかやってない)
[Write → yes → Quit]

f:id:itouhiro:20140730092528g:plain

確保した領域に対して、ファイルシステム・SWAP作成。

# mkfs.ext4 /dev/sda1
# mkfs.ext4 /dev/sda2

# mount /dev/sda2 /mnt
# mkswap /dev/sda1
# swapon /dev/sda1

f:id:itouhiro:20140730093037p:plain


次はbase systemをネット経由で取得するらしい。mirror list のテキストファイルを編集します。

# vi /etc/pacman.d/mirrorlist

f:id:itouhiro:20140730093617p:plain


Japan を上に持ってきて保存。
それでは基本ファイルをインストール。

# pacstrap /mnt base base-devel

f:id:itouhiro:20140730093832p:plain


fstabを生成。

# genfstab -p /mnt >> /mnt/etc/fstab


/mntの中に入ります。

# arch-chroot /mnt

f:id:itouhiro:20140730095927p:plain


ロケールを編集して、「en_US.UTF-8UTF-8」だけコメントアウトします。

# vi /etc/locale.gen

f:id:itouhiro:20140730100050p:plain


ロケールを有効化します。

# locale-gen
# echo LANG=en_US.UTF-8 > /etc/locale.conf
# export LANG=en_US.UTF-8


キーボード設定で日本語キーボードを設定「KEYMAP=jp106」します。

# vi /etc/vconsole.conf

f:id:itouhiro:20140730100652p:plain


タイムゾーンを設定します。

# ln -s /usr/share/zoneinfo/Asia/Tokyo /etc/localtime
# hwclock --systohc --utc


rootのパスワードを設定します。

# passwd

f:id:itouhiro:20140730100916p:plain


ブートローダgrubをインストールします。

# pacman -S grub 
# grub-install --target=i386-pc --recheck --debug /dev/sda
# grub-mkconfig -o /boot/grub/grub.cfg

f:id:itouhiro:20140730101214p:plain
f:id:itouhiro:20140730101257p:plain


ネットワーク設定です。DHCPで接続するよう指定。

# systemctl enable dhcpcd.service

電源OFFです。

# exit
# umount -R /mnt
# poweroff

GUI環境インストール

isoファイルを外します。
f:id:itouhiro:20140730101638p:plain


ネットワーク#2を[Host Only]で追加します。
f:id:itouhiro:20140730114354p:plain


ArchLinux起動。

一般ユーザーを追加。'sudo'を使用可能にするため、visudoで「foo ALL=(ALL) NOPASSWD:ALL」を追加。

# useradd -m foo
# passwd foo
# visudo


X Window Systemを導入。VirtualBox使用なのでデバイスドライバーは xf86-video-vesa

# pacman -S xorg-server xorg-server-utils xorg-xinit xorg-xclock xterm
# pacman -S xf86-video-vesa
# pacman -S xfce4

f:id:itouhiro:20140730102824p:plain
途中、何か聞かれたら Y か Enter か Default で。
f:id:itouhiro:20140730103509p:plain


ディスプレイマネージャ(ログイン時からGUIになってるやつ)は導入しません。コンソールで起動して、必要なときだけ以下コマンドでGUIを立ち上げるのが私の使用法には合っているためです。

# startxfce4

f:id:itouhiro:20140730103143j:plain

「ログアウト」してXを終了。


ここまででArch Linuxを使えるようになりました。
このあとは、SSHトンネリングで使うための設定なので、人によっては必要ないです。


ネットワーク設定

ネットワーク設定します。

まずSSHサーバーを入れます。

# pacman -Ss ssh | less
# pacman -Ss openssh
# pacman -S openssh

ArchLinuxはインストールしただけじゃ起動してくれないようだ。Debianは起動してくれたのだけど。

# systemctl start sshd.service
# systemctl enable sshd.service


ネットワークインターフェース #1, #2 ともにDHCPになってしまっているようなので、個別に設定します。
まずネットワークインターフェースの名前を調べる。今回の環境では #1は「enp0s3」、#2は「enp0s8」という名でした。

# ls /sys/class/net


IPアドレス割り当て状態を調べる。

# ip addr


DHCP設定を無効にしましょう。

# systemctl --type=service
# systemctl stop dhcpcd.service
# systemctl disable dhcpcd.service

一度ArchLinux再起動してもいいかも。

# reboot


ArchLinuxには、 systemctl と似た netctl というネットワーク設定ツールがあるので、それを使用します。まずはインストール。

# pacman -Ss netctl
# pacman -S netctl


「enp0s3」は通常のインターネット接続に使うのでDHCP。「enp0s8」はSSHトンネリングのために導入したのでstatic IP。 それぞれの設定サンプルファイルをcopyして少し書き換えます。

# cp -p /etc/netctl/examples/ethernet-dhcp /etc/netctl/en1
# cp -p /etc/netctl/examples/ethernet-static /etc/netctl/en2


/etc/netctl/en1 の中身を書き換える。Interfaceの部分を変えただけです。

Description='A basic dhcp ethernet connection'
Interface=enp0s3
Connection=ethernet
IP=dhcp
## for DHCPv6
#IP6=dhcp
## for IPv6 autoconfiguration
#IP6=stateless


/etc/netctl/en2 の中身を書き換える。

Description='A basic static ethernet connection'
#AutoWired=yes
Interface=enp0s8
Connection=ethernet
IP=static
Address=('192.168.56.102/24')
Gateway='192.168.56.1'
DNS=('192.168.56.1 8.8.8.8')


接続できるかテスト実行。

# netctl start en1
# netctl start en2


SSHトンネリング接続成功。
f:id:itouhiro:20140730113504p:plain


このネットワーク設定をArchLinux起動時に実行するよう指定。

# netctl enable en1
# netctl enable en2


SSHトンネリングしたとき、SSHログインできるまでが長い(1分ほど待たされる)のは以下の書き換えで解決。

--- /etc/ssh/sshd_config.orig   2014-04-21 04:38:44.000000000 +0900
+++ /etc/ssh/sshd_config        2014-07-30 15:48:49.351163875 +0900
@@ -114,3 +114,3 @@
 #ClientAliveCountMax 3
-#UseDNS yes
+UseDNS no
 #PidFile /run/sshd.pid

VNCも入れる。まずは一度起動して初期ファイルを ~/.vncに生成させます。そのときパスワード入力も必要です。パスワードは入力したくないけど -passwd というオプションはないと言われるし‥‥

$ sudo pacman -S tigervnc
$ vncserver
$ vncserver -kill :1
$ vi .vnc/xstartup
$ chmod 755 ~/.vnc/xstartup


xstartupの中身。
~/.vnc/xstartup

#!/bin/sh
export XKL_XMODMAP_DISABLE=1
exec startxfce4


VNCサーバーの :1 は 192.168.56.102:5901 ポートでつなげる。PuTTYSSHトンネリング設定すると、192.168.56.102:5901 にlocalhost:5902 でアクセス可能。

VNC起動。画面が出てくるまで1分待たされるのはソフト起動待ち?

$ vncserver :1

f:id:itouhiro:20140730162159p:plain


‥‥しかしここまでの設定だとSSHトンネリングは成功する一方、外部ネットワークにつながらない( ping www.google.com の応答がない)。

$ sudo netctl stop en1
$ sudo netctl stop en2
$ sudo systemctl start dhcpcd.service

すれば、一時的に外部につながるようになりますが、SSHトンネリング不可です。netctlのDHCPとdhcpcdのDHCPは何か違うのか‥‥


調べると、

$ sudo netctl stop en2

だけ実行すれば外部ネットワークにつながる( ping www.google.com の応答あり)と判明した。en2の何かわるいのか‥‥DNSGatewayの記述がじゃまなのでは?
/etc/netctl/en2 の中身を書き換える。

Description='A basic static ethernet connection'
#AutoWired=yes
Interface=enp0s8
Connection=ethernet
IP=static
Address=('192.168.56.102/24')
# Gateway='192.168.56.1'
# DNS=('192.168.56.1 8.8.8.8')

こうすると、SSHトンネリングも可能で、しかも外部ネットワークにつながるようになった。


Linuxシステム[実践]入門 (Software Design plus)

Linuxシステム[実践]入門 (Software Design plus)

FontForge 2.0.20140101 日本語対応版をArch Linuxにインストール

$
0
0

f:id:itouhiro:20140824150917p:plain


Arch Linuxのインストールは http://itouhiro.hatenablog.com/entry/20140730/linuxを参照。

まずは Arch Build System をインストール。

# pacman -S abs

https://www.archlinux.org/packages/extra/i686/fontforge/
を見ると「Repository: Extra」とある。

/etc/abs.conf でextraの前に ! がないか確認する。

REPOS=(core extra !community !testing !community-testing
       !staging !community-staging !gnome-unstable !kde-unstable)

absコマンドを実行して、absツリーを取得。

# abs

/etc/makepkg.conf を書き換えてPACKAGERを設定。

#PACKAGER="John Doe <john@doe.com>"
PACKAGER="Itou Hiroki <itouhiro !atmark! users.sourceforge.jp>"

このあとはrootではなく、一般ユーザーで実行します。

ビルドディレクトリの作成

$ mkdir ~/abs
$ cp -pr /var/abs/extra/fontforge ~/abs/
$ cd ~/abs/fontforge/


日本語パッチの準備
http://www.geocities.jp/meir000/fontforge/の日本語縦書きパッチを取得。

$ wget http://www.geocities.jp/meir000/fontforge/fontforge-20140104-vmetrics.patch.txt
$ sha1sum fontforge-20140104-vmetrics.patch.txt
$ vi PKGBUILD


編集する箇所

--- PKGBUILD.orig       2014-07-31 07:05:48.000000000 +0900
+++ PKGBUILD    2014-07-31 16:20:41.938494158 +0900
@@ -16,10 +16,12 @@
          'python2' 'desktop-file-utils' 'gtk-update-icon-cache' 'hicolor-icon-theme')
 source=("https://github.com/fontforge/fontforge/archive/${_pkgver}.tar.gz"
         'http://fontforge.org/cidmaps.tgz'
-        'giflib.patch')
+        'giflib.patch'
+        'fontforge-20140104-vmetrics.patch.txt')
 sha1sums=('abce297e53e8b6ff6f08871e53d1eb0be5ab82e7'
           'efbc7c9d3e95159f5600dc71f9cccb370e46bb94'
-          '420dd1dd75d72719f3203d832bfa8c1c7e7eef86')
+          '420dd1dd75d72719f3203d832bfa8c1c7e7eef86'
+          'f056b3ae8afb432b289000c2193c221cddc5830f')

 options=('!makeflags')
 install=install
@@ -28,6 +30,7 @@
        cd "${srcdir}/${pkgname}-${_pkgver}"
        sed '/fontforge_package_name/s/^#//' -i configure.ac
        patch -p1 -i ../giflib.patch
+       patch -p1 -i ../fontforge-20140104-vmetrics.patch.txt
        ./autogen.sh
 }


ビルド

$ makepkg -s


ビルドを待つ。

[foo@localhost fontforge]$ makepkg -s
/usr/bin/makepkg: eval: line 2272: unexpected EOF while looking for matching `"'
/usr/bin/makepkg: eval: line 2273: syntax error: unexpected end of file
==> Making package: fontforge 20140101-3 (Thu Jul 31 16:14:44 JST 2014)
==> Checking runtime dependencies...
==> Installing missing dependencies...
warning: skipping target: libspiro
resolving dependencies...
looking for inter-conflicts...

Packages (7): libsodium-0.6.1-1  giflib-5.1.0-1  libspiro-1:0.2-1
              libunicodenames-1.1.0_beta1-1  libxkbui-1.0.2-5  python2-2.7.8-1
              zeromq-4.0.4-3

Total Download Size:    10.07 MiB
Total Installed Size:   72.74 MiB

:: Proceed with installation? [Y/n] Y

...

==> Making package: fontforge 20140101-3 (Thu Jul 31 16:22:16 JST 2014)
==> Checking runtime dependencies...
==> Checking buildtime dependencies...
==> Retrieving sources...
  -> Found 2.0.20140101.tar.gz
  -> Found cidmaps.tgz
  -> Found giflib.patch
  -> Found fontforge-20140104-vmetrics.patch.txt
==> Validating source files with sha1sums...
    2.0.20140101.tar.gz ... Passed
    cidmaps.tgz ... Passed
    giflib.patch ... Passed
    fontforge-20140104-vmetrics.patch.txt ... Passed
==> Extracting sources...
  -> Extracting 2.0.20140101.tar.gz with bsdtar
  -> Extracting cidmaps.tgz with bsdtar
==> Starting prepare()...
patching file gutils/gimagereadgif.c
patching file fontforge/splinechar.c
patching file fontforge/splinefont.c
patching file fontforge/tottfgpos.c
patching file fontforgeexe/charview.c
patching file fontforgeexe/cvpointer.c
Preparing the fontforge build system...please wait

Found GNU Autoconf version 2.69

...

==> Creating package "fontforge"...
  -> Generating .PKGINFO file...
  -> Adding install file...
  -> Generating .MTREE file...
  -> Compressing package...
==> Leaving fakeroot environment.
==> Finished making: fontforge 20140101-3 (Thu Jul 31 17:17:25 JST 2014)
[foo@localhost fontforge]$ ls
./                   fontforge-20140101-3-i686.pkg.tar.xz   pkg/
../                  fontforge-20140104-vmetrics.patch.txt  PKGBUILD
2.0.20140101.tar.gz  giflib.patch                           PKGBUILD.orig
cidmaps.tgz          install                                src/
[foo@localhost fontforge]$

patchも適切に適用されたようである。


これをインストール。

$ sudo pacman -U fontforge-20140101-3-i686.pkg.tar.xz

f:id:itouhiro:20140731172926p:plain

等幅フォント NatuMono を試作

$
0
0

等幅フォント NatuMono(ナツ モノ)を試作しました。
f:id:itouhiro:20140813003959p:plain

ばぱ びぴ ぶぷ べぺ ぼぽ バパ ビピ ブプ ベペ ボポ(濁点・半濁点)
カ力 エ工 ロ口 ー一 ニ二 タ夕 ト卜(カタカナ・漢字)
へヘ     (ひらがな・カタカナ)
1Il 1Il(数字1・大文字アイ・小文字エル)
0O 0O  (数字ゼロ・大文字オー)
~〜     (FULLWIDTH TILDE U+FF5E・WAVE DASH U+301C)

アプリのページのパフォーマンス
夕方のタンポポ ペーパー一枚 協力
for (i=0; i<numItem.length; i++) {
  console.log('2Z_5S8');
}

特徴

源真ゴシック (げんしんゴシック)等幅 Regular http://mm.xvs.jp/font/genshin/
Version 1.000.20140807
に以下の改変を加えました。

・濁点文字・半濁点文字を区別できるよう、半濁点を1.3倍に大きくする
・0O(数字ゼロ・大文字オー)を区別できるよう、数字ゼロにスラッシュを入れる
・全角大文字アイIの横棒が長すぎて半角カタカナのエに見えるので短くする
・カ力 エ工 ロ口 ー一 ニ二 タ夕 ト卜(カタカナ・漢字)を区別できるよう、漢字の字形を加工する
・へヘ(ひらがな・カタカナ)を区別できるよう、カタカナの字形を加工する
・~〜(FULLWIDTH TILDE U+FF5E・WAVE DASH U+301C)を区別できるよう、U+301CをUnicode字形にする

現時点ではウェイトはRegularのみです。Boldはありません。

作成環境

Windows 7 64bit
・unofficial fontforge-cygwin 2014_01_04 (FontForge 2.0.20140101+縦書きパッチ)
・源真ゴシック等幅 Regular Version 1.000.20140807 http://mm.xvs.jp/

ライセンス(源真ゴシックを参考にしました)

・NatuMonoフォントのフォントファイルは、源ノ角ゴシックと同じ Apache 2.0 License のもとで使用することができます。
・フォントデータに含まれる、源ノ角ゴシック由来の文字グリフの著作権Adobeが所有しています。源真ゴシック等幅の半角等幅字形は、源ノ角ゴシックに含まれていたものだそうです。
・フォントデータに含まれる、M+ OUTLINE FONTS 由来の文字グリフの著作権は M+ FONTS PROJECT が所有しています。

Apache 2.0 License の日本語訳は、以下から参照することができます。
http://sourceforge.jp/projects/opensource/wiki/licenses%2FApache_License_2.0

謝辞

源真ゴシック作成者のMM様、源ノ角ゴシック作成者のAdobe様、M+ OUTLINE FONTS作成者のM+ FONTS PROJECT 様、FontForge作成者様ありがとうございます。

FontForgeで生成した日本語TrueTypeフォント文字幅広すぎ対策

$
0
0

FontForgeで日本語TrueTypeフォントを出力したとき、文字幅が広すぎることがよくあります。

たとえばIPAゴシックを読み込んですぐ [ファイル>フォントを出力]TrueTypeフォント保存するだけで、以下のようにまるで全角文字の幅が2倍になったようになります。

f:id:itouhiro:20140910173716p:plain

この原因は、FontForgeの不具合です。

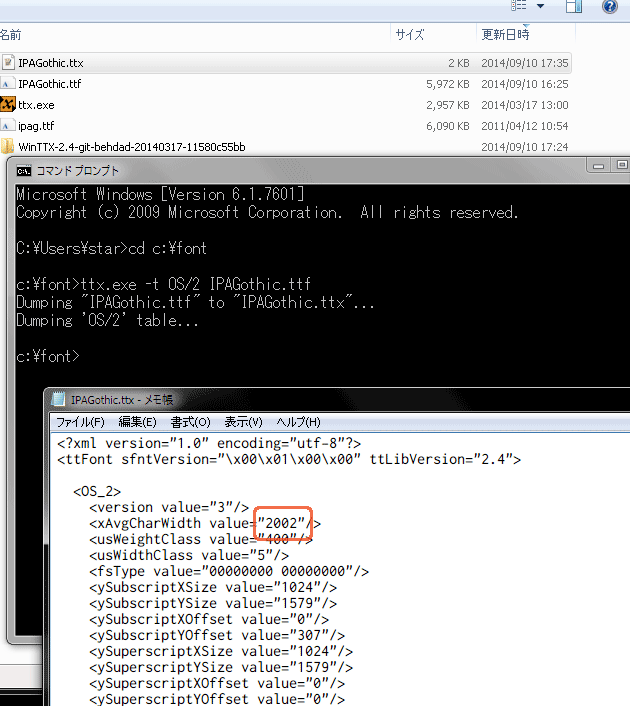
詳しくは M+ FONTS >メーリングリストのこのスレッド http://sourceforge.jp/projects/mplus-fonts/lists/archive/dev/2011-July/000601.htmlにありますが、OS/2テーブルのxAvgCharWidthの値が、FontForgeを通すとおかしくなるためです。

環境

修正方法

  1. OS/2テーブルのバージョンを書き換える
    上記のスレッドにある「OS/2テーブルのバージョンを書き換える」をやっているのが、Rictyフォント https://github.com/yascentur/Rictymisc/os2version_reviser.shスクリプトです。しかしこれは、Ricty以外のフォントには効果ないことが多いです。
    FontForge[エレメント>フォント情報>OS/2>OS/2バージョン]を 1 にすると直る場合もあるようですが、今回のIPAゴシックでは直りませんでした。

  2. xAvgCharWidth を直接書き換える
    これが確実な方法です。書き換える方法は今だと TTX/FontTools http://sourceforge.net/projects/fonttools/がよいと思います。

TTXインストール

Unixの人は fonttools-2.4.tar.gzをそのままインストールもできますし、AFDKO http://www.adobe.com/devnet/opentype/afdko.htmlをインストールすればTTXもインストールされます。

しかし、Windowsだと http://rtfreesoft.blogspot.jp/search/label/ttxのWinTTX 2.4がよかったです。Pythonインストールしなくてすみますし動作も確実です。以下はこのWinTTXに含まれるttx.exeを使用します。インストールは必要なく、zipファイルから取り出したexeファイルをそのまま使用します。

TTXを使用する

準備

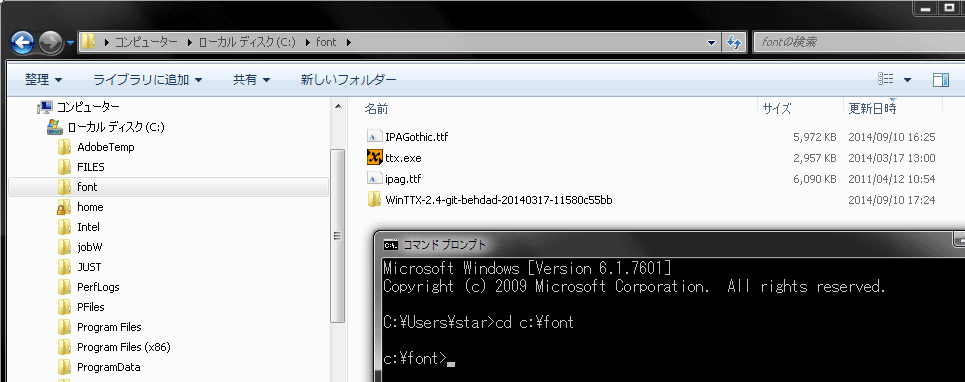
C:\font (どこでもよいですが今回はここ)に以下を配置します。

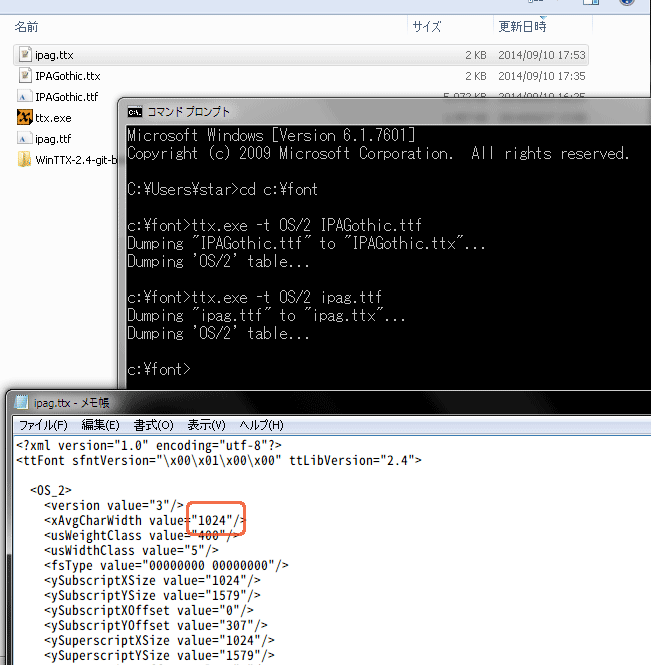
  • 文字幅がおかしくなる前の元フォント ipag.ttf
  • 文字幅がおかしいIPAGothic.ttf
  • WinTTXに含まれるttx.exe

[Windowsのスタートメニュー>すべてのプログラム>アクセサリ>コマンドプロンプト]を起動します。

f:id:itouhiro:20140910173749p:plain

cd c:\font

と入力します。これでttx.exeを使える場所に来ました。

OS/2テーブルを書き出す

ttx.exe -t OS/2 IPAGothic.ttf

と入力します。OS/2テーブルがテキストファイIPAGothic.ttxとして出力されましたよ。

f:id:itouhiro:20140910174945p:plain

ttxファイルを書き換え

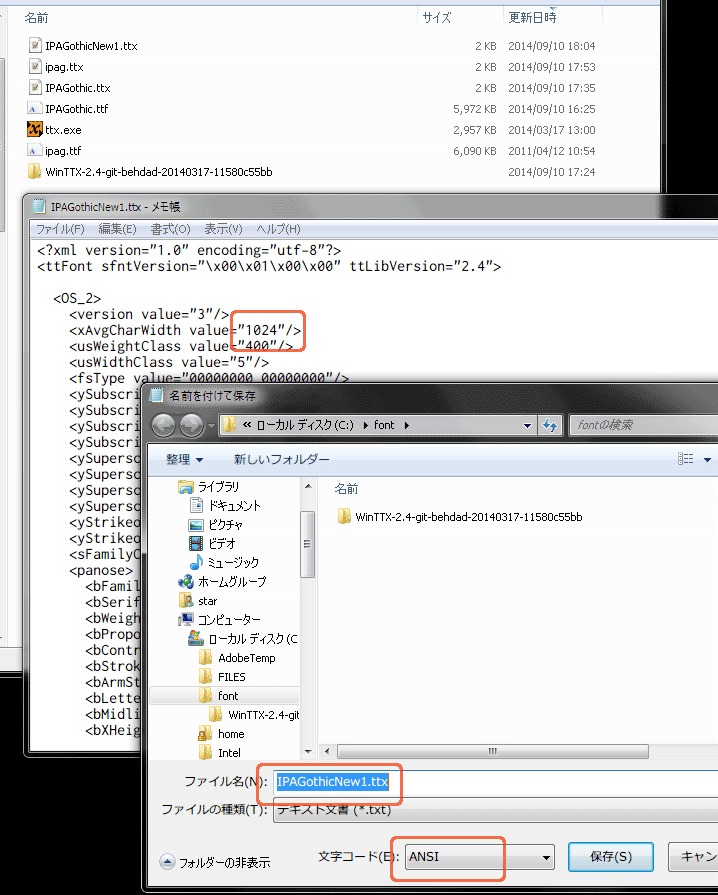
ttxファイルをテキストエディターで開いて、 xAvgCharWidth を書き換えましょう。 フォントごとに違う値を指定する必要があります。

今回は 1024 にします。この 1024 はどこから出てきたかというと、書き換え前の ipag.ttfOS/2テーブルの xAvgCharWidth の値です。

f:id:itouhiro:20140910175912p:plain

IPAGothic.ttxを書き換えて、保存するのですが、このとき2点注意があります。

  1. IPAGothic.ttxは BOMつきUTF-8ファイルだが、BOMなしとして保存する必要がある。
  2. ファイル名は新しいフォント名になるので、IPAGothic.ttx とは違う名前にしておく。

1は、テキストエディターが「メモ帳」の場合は 「文字コード」をANSIにすればよいです。ほかのテキストエディターの場合は文字コードで「UTF-8(BOM無し)」や「シフトJIS」を選べばよいはず。

2は、ここでは New1とファイル名に追加しておきます。

f:id:itouhiro:20140910181032p:plain

文字幅おかしいフォントのOS/2テーブルを書き換える

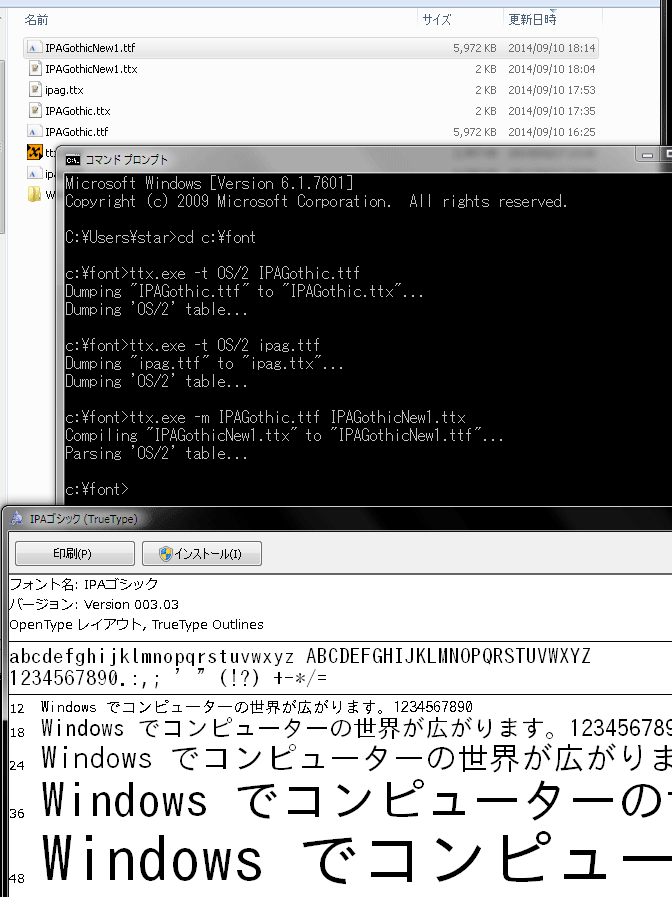
文字幅おかしいTrueTypeファイルを修正しましょう。先ほどのttxファイルでOS/2テーブルを上書きします。

ttx.exe -m IPAGothic.ttf IPAGothicNew1.ttx

これでフォントが修正されました。

f:id:itouhiro:20140910182150p:plain

余談

xAvgCharWidth の値はIPAゴシックの場合 1024 となっていました。等幅フォントの場合、半角英数字の幅も同じ値だと思います。 xAvgCharWidth の意味は「半角英数字の平均的な横幅」ですから、等幅フォントだとそうなりますよね。

f:id:itouhiro:20140910182333p:plain


FlashDevelop 4.6.4 + Apache Flex 4.13 + FlashPlayer 14 をインストール

$
0
0

Flashゲームパッドを使いたい。参考: http://ics-web.jp/lab/archives/512

それにはFlashPlayer 11.8以上のswfを生成しなくてはならない。 有料のFlash CCでもできるけど、FlashDevelop とFlexSDKを使い、無料でやってみようと思う。

手順

Install FlashDevelop

http://www.flashdevelop.org/でinstallerをdownload。exeを実行→すでにFlashDevelop4がインストール済みならアップデート。

Install Apeche FlexSDK

C:\Program Files (x86)\FlashDevelop\Tools\appman\AppMan.exeを実行する。

ApacheFlexSDK 3.1 Installer(これでApacheFlex 4.13をインストールできるらしい)を選択してOKすると、なにやらエラーが出る。

f:id:itouhiro:20140912191752p:plain

しかたないので、 http://flex.apache.org/download-binaries.htmlWindows向けApacheFlexSDK binaryをdownload。 apache-flex-sdk-4.13.0-bin.zipC:\home\bin\ApacheFlex4_13に展開。 (C:\Program Files (x86)\FlashDevelop\Tools\flexsdk4_13に展開するのを試したが、消せないフォルダ作られてしまい、Windows7の不具合に嘆息した。Program Files以外に再展開した)

Setting Apeche FlexSDK

FlashDevelopを起動して、 [Tools > Program Setting > AS3Content > Install Flex SDKs > add(追加)]C:\home\bin\ApacheFlex4_13を指定する。[↑]ボタンで一番上に持っていく。

f:id:itouhiro:20140912192857p:plain

Install and setting Flash Player

C:\Program Files (x86)\FlashDevelop\Tools\appman\AppMan.exeで、Standalone Flash Playerをインストール。(このflashplayer_14_sa_debug.exeというのはダウンロードしたファイルがインストーラーでは無くて、そのまま実行できるファイル)

f:id:itouhiro:20140912193537p:plain

インストールするだけで、 [Tools > Program Setting > FlashViewer > External Player Path]も自動で設定された。これは便利。

f:id:itouhiro:20140912193816p:plain

Verify FlexSDK

FlashDevelopで適当なプロジェクトを作成し、適当なサンプルプログラムを作成する。 [Project > Property > SDK]ApacheSDK 4.13が選択されているか確認する。 [Project > Property > Output]でFlashPlayer 14を選択する。

ビルドしてみると、はいOK。

f:id:itouhiro:20140912194149p:plain

package {
    import flash.display.Sprite;
    import flash.events.Event;

    /**
     * ...
     * @author foo
     */
    public class Main extends Sprite {

        public function Main():void {
            if (stage) init();
            else addEventListener(Event.ADDED_TO_STAGE, init);
        }

        private function init(e:Event = null):void {
            removeEventListener(Event.ADDED_TO_STAGE, init);
            // entry point

            var spr:Sprite = new Sprite();
            spr.graphics.beginFill(0xcc9999);
            spr.graphics.drawCircle(100, 100, 50);
            spr.graphics.endFill();
            addChild(spr);
        }

    }

}

Setting SWF version

しかしswfファイルのバージョンを見ると 0x0e ‥‥つまり -swf-version=14、つまり http://sleepydesign.blogspot.jp/2012/04/flash-swf-version-meaning.htmlによると FlashPlayer 11.1向けのswfではないか。これではわざわざApacheFlex導入した意味がない。

f:id:itouhiro:20140912194627p:plain

[Project > Property > Compiler Options]-swf-version=25と指定する。この25は http://sleepydesign.blogspot.jp/2012/04/flash-swf-version-meaning.htmlによるFlashPlayer14の内部バージョン。 そしてビルドしてswfを調べると 0x19 = 16 + 9 = 25 なのでバッチリ FlashPlayer14向けのswfを生成できた。

f:id:itouhiro:20140912195734p:plain


Flashでゲームパッド認識 with Apache Flex 4.13

$
0
0

Flashゲームパッドを使いたい。

前の記事 http://itouhiro.hatenablog.com/entry/20140912/flashでGamePad機能に対応するswfを作成できるようになった。

次は、GamePadを認識するActionScript3の書き方を学ぶ。

FlashでGamePadの動作確認は http://ics-web.jp/lab/archives/512で可能だけどそのページにはソースがない。 Adobehttp://www.adobe.com/devnet/air/articles/game-controllers-on-air.htmlが参考になる。

サンプルどおりに組んでみるとこんな感じか。

f:id:itouhiro:20140913162804p:plain

package {
    import flash.display.Sprite;
    import flash.events.Event;
    import flash.events.GameInputEvent;
    import flash.ui.GameInput;
    import flash.ui.GameInputDevice;

    public class Main extends Sprite {
        private var logger:Logger;
        private var numPad:int;
        private var gmInput:GameInput;

        public function Main():void {
            if (stage) init();
            else addEventListener(Event.ADDED_TO_STAGE, init);
        }

        private function init(e:Event = null):void {
            removeEventListener(Event.ADDED_TO_STAGE, init);
            // entry point

            logger = new Logger('Hello GameInput');
            addChild(logger);

            if ( ! GameInput.isSupported) return;
            gmInput = new GameInput();
            gmInput.addEventListener(GameInputEvent.DEVICE_ADDED, showLog);
            gmInput.addEventListener(GameInputEvent.DEVICE_REMOVED, showLog);

            showLog(null);
        }

        private function showLog(e:Event):void {
            logger.log("GameInput.numDevices = " + GameInput.numDevices);
            if (GameInput.numDevices <= 0) return;

            for (var i:int = 0; i < GameInput.numDevices; i++ ) {
                var device:GameInputDevice = GameInput.getDeviceAt(i);
                logger.log("GameInput.getDeviceAt("+i+") = " + device);
                if ( ! device) return;
                logger.log("  device.enabled - " + device.enabled);
                logger.log("  device.id - " + device.id);
                logger.log("  device.name - " + device.name);
                logger.log("  device.numControls - " + device.numControls);
                logger.log("  device.sampleInterval - " + device.sampleInterval);
                logger.log("  device.MAX_BUFFER - " + GameInputDevice.MAX_BUFFER_SIZE);
            }
        }
    }
}
package  {
    import flash.display.Sprite;
    import flash.text.TextField;
    import flash.text.TextFieldAutoSize;
    import flash.text.TextFormat;

    public class Logger extends Sprite {
        private var tf:TextField = new TextField();
        private var lines:Array = [];

        public function Logger(str:String) {
            var fmt:TextFormat = new TextFormat('Courier New', 12, 0x333333);
            tf.defaultTextFormat = fmt;
            tf.autoSize = TextFieldAutoSize.LEFT;
            tf.x = 10;
            tf.y = 0;
            tf.text = '';
            addChild(tf);

            log(str);
        }

        public function log(str:String):void {
            lines.push(getTimeNow() + ' ' + str);
            if (lines.length >= 40) lines.shift();
            tf.text = lines.join('\n');
        }

        private function getTimeNow():String {
            var dt:Date = new Date();
            var h:String = ('0' + dt.getHours()).substr(-2);;
            var m:String = ('0' + dt.getMinutes()).substr(-2);
            var s:String = ('0' + dt.getSeconds()).substr( -2);
            var ms:String = ('00' + dt.getMilliseconds()).substr(-3);
            return h +':' + m +':' + s +'.' + ms;
        }

        public function clear():void {
            lines = [];
        }
    }
}

さて次はボタンの認識だ。

http://melancholy.raindrop.jp/wordpress/?p=88の記事によると「GameInputDeviceのキャッシュ」は扱いが難しいらしい。 http://cuaoar.jp/2013/04/adobe-air-gameinput.htmlのサンプルコードはわかりやすかった。

以下は、Event.CHANGEで入力を取得している。ボタンを押すたび放すたびに変化するvalueを表示する。

f:id:itouhiro:20140913175359p:plain

package {
    import flash.display.Sprite;
    import flash.events.Event;
    import flash.events.GameInputEvent;
    import flash.ui.GameInput;
    import flash.ui.GameInputControl;
    import flash.ui.GameInputDevice;

    public class Main extends Sprite {
        private var logger:Logger;
        private var numPad:int;
        private var gmInput:GameInput;

        public function Main():void {
            if (stage) init();
            else addEventListener(Event.ADDED_TO_STAGE, init);
        }

        private function init(e:Event = null):void {
            removeEventListener(Event.ADDED_TO_STAGE, init);
            // entry point

            logger = new Logger('Hello GameInput');
            addChild(logger);

            if ( ! GameInput.isSupported) return;
            gmInput = new GameInput();
            gmInput.addEventListener(GameInputEvent.DEVICE_ADDED, showDevice);
            gmInput.addEventListener(GameInputEvent.DEVICE_REMOVED, showDevice);

            showDevice(null);
        }

        private function showDevice(e:Event):void {
            logger.log("GameInput.numDevices = " + GameInput.numDevices);
            if (GameInput.numDevices <= 0) return;

            for (var i:int = 0; i < GameInput.numDevices; i++ ) {
                var device:GameInputDevice = GameInput.getDeviceAt(i);
                logger.log("GameInput.getDeviceAt("+i+") = " + device);
                if ( ! device) return;
                device.enabled = true;
                logger.log("  device.enabled - " + device.enabled);
                logger.log("  device.id - " + device.id);
                logger.log("  device.name - " + device.name);
                logger.log("  device.numControls - " + device.numControls);
                for (var j:int = 0; j < device.numControls; j++) {
                    var control:GameInputControl = device.getControlAt(j);
                    logger.log("    control:id=" + control.id + ", value=" + control.value + " (" + control.minValue+" .. " + control.maxValue+")");
                    control.addEventListener(Event.CHANGE, showButtonStat);
                }
            }
        }

        private function showButtonStat(e:Event):void {
            var control:GameInputControl = e.target as GameInputControl;
            logger.log("    control:id=" + control.id + ", value=" + control.value + " (" + control.minValue+" .. " + control.maxValue+")");
        }
    }
}


Adobe Flash professional CC. Classroom in a book

Adobe Flash professional CC. Classroom in a book

Nasuフォント ― 見た目が似ている文字を判別しやすくするフリーフォント

$
0
0

Nasu(ナス)フォントを作成しました。

f:id:itouhiro:20140916224949p:plain

特徴

見た目が似ていてまちがいやすい文字・見た目が同じだが違う文字を、判別しやすくするフォントです。

ダウンロード

https://sourceforge.jp/downloads/users/7/7228/NasuFont-20140917.zip (約12MB)

以下の2種類のフォントを含みます。

  • Nasu(ナス)     半角英数字はプロポーショナル、全角文字は等幅
  • NasuM(ナス・エム)  等幅フォント

それぞれ Regular, Bold のウェイトがあります。

[合いの手]フリーフォントなんだね。

[話者]そうだよ。Adobeオープンソースフォント「源ノ角ゴシック」の改変フォントなんだ。より正確には、源ノ角ゴシックを改変した「源真ゴシック」と「源暎ゴシック」をさらに改変した。

[合いの手]元の「源ノ角ゴシック」と比べて、どこが変わったのさ?

[話者]濁点文字・半濁点文字を判別しやすくした。

f:id:itouhiro:20140916205211p:plain

カ力 エ工 ロ口 ー一 ニ二 タ夕 ト卜(カタカナ・漢字)を判別しやすくした。ヘへ(カタカナ・ひらがな)を判別しやすくした。

f:id:itouhiro:20140916205219p:plain

数字1・小文字エル・大文字アイ(全角・半角)を判別しやすくした。数字ゼロ・大文字オー(全角・半角)を判別しやすくした。

f:id:itouhiro:20140916205924p:plain

これが主な変更点だ。 あとは

  • ~〜(FULLWIDTH TILDE U+FF5E・WAVE DASH U+301C)を判別しやすくした。
  • 全角ローマ数字ⅠⅡⅢⅣⅤⅥⅦⅧⅨⅩⅪⅫに横棒をつける
  • 等幅フォントのみ、行間を狭くした。「 { } 」を横に伸ばす。「 ~ 」を縦に伸ばした。

[合いの手]もとよりも、わるくなった点はあるの?

[話者]もとの「源ノ角ゴシック」は7ウェイト、つまり太さが7種類あるんだけど、このNasuフォントは 2種類しかないんだ。 でも、Regularを「太字」指定するとBoldが使われるから、WordとかWebブラウザーで使いやすいぞ。

f:id:itouhiro:20140916213657p:plain

[合いの手]このフォント名はなにか意味あるのかい?

[話者]もとの「源ノ角ゴシック」は戦国武将みたいな迫力ありすぎな名前だから、Googleの出してるNotoフォントのほうの名前を参考にして少し変えたんだ。意識してるUDフォントのuをつけて‥‥

[合いの手]源ノ角で戦国武将というと源 義経(みなもとの よしつね)とか?

[話者]源氏の武将として有名なのは、ほかには那須与一(なすの よいち)もいるよね。そこから名前をいただいて、Nasuフォントとしたんだ。

[合いの手]ふーん。

作成環境

  • Windows 7 64bit
  • unofficial fontforge-cygwin 2014_01_04 (FontForge 2.0.20140101+縦書きパッチ)
  • Source Han Sans(源ノ角ゴシック)ver 1.000
      源真ゴシックの元フォント。
  • 源真ゴシック Version 1.058.20140828 http://jikasei.me/
      「源真ゴシック Regular/Bold, 源真ゴシック等幅 Regular/Bold」を改変のベースにさせていただきました。
  • 源暎ゴシック Ver 1.000.140830 http://okoneya.jp/font/
      全角カタカナの「タ ダ」の2文字を取り込ませていただきました。

ライセンス

  • Nasuフォントは、Apache 2.0 License のもとで使用することができます。
  • 「源ノ角ゴシック」由来の文字グリフの著作権Adobe様が所有しています。
      等幅の半角英数字形は、源ノ角ゴシックに含まれていた Source Code Pro ベースのものです。
  • 「源真ゴシック」由来の文字グリフの著作権は 自家製フォント工房 様が所有しています。
  • 「源暎フォント」由来の文字グリフの著作権は おたもん 様が所有しています。
  • 「M+ OUTLINE FONTS」由来の文字グリフの著作権は M+ FONTS PROJECT 様が所有しています。

    Apache 2.0 License の日本語訳は、以下から参照することができます。 http://sourceforge.jp/projects/opensource/wiki/licenses%2FApache_License_2.0

謝辞

源真ゴシック作成者のMM様、源暎フォント作成者のおたもん様、源ノ角ゴシック作成者のAdobe様、M+ OUTLINE FONTS作成者のM+ FONTS PROJECT 様、FontForge作成者様ありがとうございます。

連絡

報告は Twitter @itouhiro にどうぞ。


Source Han Sans(源ノ角ゴシック)ver1.001 「かな」字形の変更点

$
0
0

Source Han Sans(源ノ角ゴシック) ver1.001
https://github.com/adobe-fonts/source-han-sans/tree/1.001R
ChangeLogSourceHanSansReadMe.pdfのp19)見たら

Japanese
・A small number of glyphs for kana were tweaked for improved readability
(少数の「かな」字形を微調整したよ。読みやすさを改善するためにね)

具体的にどの文字を調整したのか、もっと詳しく知りたいと思った。 調べてみた。

「タ ダ ネ」の3文字が大きな違い。

f:id:itouhiro:20140923170730p:plain

Nasuフォント ver2014.0925 の合成用濁点・半濁点

$
0
0

Nasuフォント http://itouhiro.hatenablog.com/entry/20140917/font ver2014.0925 の合成用濁点・半濁点設定についてメモ。

使用方法

以下からコピーすれば使える。

ほかの使い方は、Google日本語入力であれば、ローマ字入力設定でたとえば a と @ を押すと U+3042 + U+3099 と入力されるように設定できるはず。ATOKはムリなはず。

あ゙い゙ゔえ゙お゙
がぎぐげご
ざじずぜぞ
だぢづでど
な゙に゙ぬ゙ね゙の゙
ばびぶべぼ
ま゙み゙む゙め゙も゙
や゙ゆ゙よ゙
ら゙り゙る゙れ゙ろ゙
わ゙ゐ゙ゑ゙を゙ん゙
っ゙ゃ゙ゅ゙ょ゙
ぁ゙ぃ゙ぅ゙ぇ゙ぉ゙

ア゙イ゙ヴエ゙オ゙
ガギグゲゴ
ザジズゼゾ
ダヂヅデド
ナ゙ニ゙ヌ゙ネ゙ノ゙
バビブベボ
マ゙ミ゙ム゙メ゙モ゙
ヤ゙ユ゙ヨ゙
ラ゙リ゙ル゙レ゙ロ゙
ヷヸヹヺン゙
ッ゙ャ゙ュ゙ョ゙
ァ゙ィ゙ゥ゙ェ゙ォ゙

あ゚い゚う゚え゚お゚
か゚き゚く゚け゚こ゚
さ゚し゚す゚せ゚そ゚
た゚ち゚つ゚て゚と゚
な゚に゚ぬ゚ね゚の゚
ぱぴぷぺぽ
ま゚み゚む゚め゚も゚
や゚ゆ゚よ゚
ら゚り゚る゚れ゚ろ゚
わ゚ゐ゚ゑ゚を゚ん゚
っ゚ゃ゚ゅ゚ょ゚
ぁ゚ぃ゚ぅ゚ぇ゚ぉ゚

ア゚イ゚ウ゚エ゚オ゚
カ゚キ゚ク゚ケ゚コ゚
サ゚シ゚ス゚セ゚ソ゚
タ゚チ゚ツ゚テ゚ト゚
ナ゚ニ゚ヌ゚ネ゚ノ゚
パピプペポ
マ゚ミ゚ム゚メ゚モ゚
ヤ゚ユ゚ヨ゚
ラ゚リ゚ル゚レ゚ロ゚
ワ゚ヰ゚ヱ゚ヲ゚ン゚
ッ゚ャ゚ュ゚ョ゚
ァ゚ィ゚ゥ゚ェ゚ォ゚

「彼が有名なウルトラマン氏だ」
「え゙ぇ゙ーっ!」「人間サイズじゃないですか。ビルより大きいって聞いてたのに……」
「――まあまあ、まずは挨拶からだ」
「ジョ゙ヷッ゙、シ゚ュ゚ワ゚ワ♣」
「日本語でおk」

「彼が有名なウルトラマン氏だ」
「え゙ぇーっ!」「人間サイズじゃないですか。ビルより大きいって聞いてたのに……」
「――まあまあ、まずは挨拶からだ」
「ジョヷッ、シ゚ュワ゚ワ♣」
「日本語でおk」

ア゙パ
あ゛は゜
~〜(FULLWIDTH TILDE U+FF5E・WAVE DASH U+301C)

制限仕様

Adobe Illustrator CS6で調べると、

  • ちいさな文字(っゃゅょぁぃぅぇぉ)と合成濁点・半濁点の組み合わせ
  • 縦書き

のとき、うまく表示できない。フォントの設定が問題なのか、アプリ側の問題なのか不明。縦書きするなら、ちいさな文字に合成濁点を使うのはひかえたほうがよさそうである。

f:id:itouhiro:20140925182941p:plain

f:id:itouhiro:20140925182950p:plain

作成方法

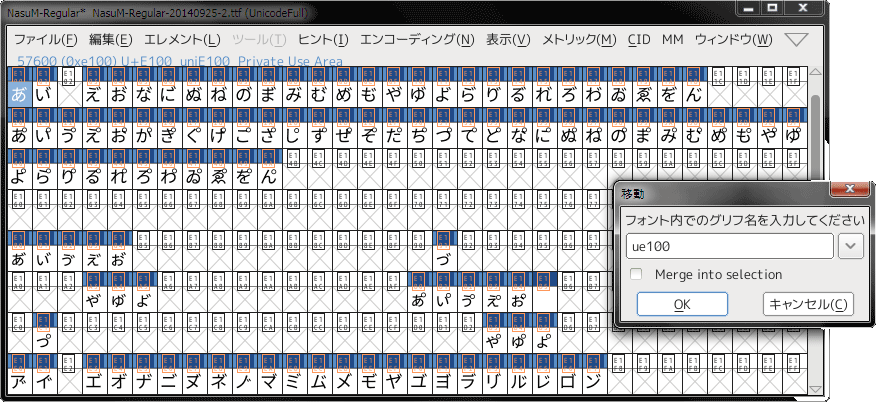
Unicode Private AreaであるU+E100~に、濁点・半濁点合成済み文字を作字した。この文字配置は「GL-アンチック」 http://gutenberg.sourceforge.jp/となるべく同じにしている。

f:id:itouhiro:20140925180816p:plain

・GSUBテーブルの設定で、

「あ」(このフォントでは cid01454 という名前。FontForgeで見ればわかる)
+
「゜」合成用濁点(このフォントでは cid01539 という名前)
=
「あ゛」(このフォントでは uniE100 という名前。上の画像でFontForgeウィンドウ上部に表示されている)

のような設定をそれぞれの文字について設定する。 具体的にはTTXで書き出したGSUBテーブル設定の一部、具体的には 最初から「う cid01463」+「゛ cid01539」=「ゔ cid01536」のような設定は用意されている

<LigatureSet glyph="cid01458">
            <Ligature components="cid01539" glyph="cid01536"/>
          </LigatureSet>

ので、その部分を以下のように書き換えて(「ぁあぃいぅうぇえぉお」などはもちろん削除する)、TTXで書き戻す。TTXの使い方は http://itouhiro.hatenablog.com/entry/20140910/font参照。

以下のテキストは、源真ゴシックがもともと持っているリガチャー設定と、新規作成した設定を両方含む。

ぁあぃいぅうぇえぉお
          <LigatureSet glyph="cid01453">
            <Ligature components="cid01540" glyph="uniE1B0"/>
            <Ligature components="cid01539" glyph="uniE180"/>
          </LigatureSet>
          <LigatureSet glyph="cid01454">
            <Ligature components="cid01540" glyph="uniE120"/>
            <Ligature components="cid01539" glyph="uniE100"/>
          </LigatureSet>
          <LigatureSet glyph="cid01455">
            <Ligature components="cid01540" glyph="uniE1B1"/>
            <Ligature components="cid01539" glyph="uniE181"/>
          </LigatureSet>
          <LigatureSet glyph="cid01456">
            <Ligature components="cid01540" glyph="uniE121"/>
            <Ligature components="cid01539" glyph="uniE101"/>
          </LigatureSet>
          <LigatureSet glyph="cid01457">
            <Ligature components="cid01540" glyph="uniE1B2"/>
            <Ligature components="cid01539" glyph="uniE182"/>
          </LigatureSet>
          <LigatureSet glyph="cid01458">
            <Ligature components="cid01540" glyph="uniE122"/>
            <Ligature components="cid01539" glyph="cid01536"/>
          </LigatureSet>
          <LigatureSet glyph="cid01459">
            <Ligature components="cid01540" glyph="uniE1B3"/>
            <Ligature components="cid01539" glyph="uniE183"/>
          </LigatureSet>
          <LigatureSet glyph="cid01460">
            <Ligature components="cid01540" glyph="uniE123"/>
            <Ligature components="cid01539" glyph="uniE103"/>
          </LigatureSet>
          <LigatureSet glyph="cid01461">
            <Ligature components="cid01540" glyph="uniE1B4"/>
            <Ligature components="cid01539" glyph="uniE184"/>
          </LigatureSet>
          <LigatureSet glyph="cid01462">
            <Ligature components="cid01540" glyph="uniE124"/>
            <Ligature components="cid01539" glyph="uniE104"/>
          </LigatureSet>
かきくけこ
          <LigatureSet glyph="cid01463">
            <Ligature components="cid01540" glyph="uniE125"/>
            <Ligature components="cid01539" glyph="cid01464"/>
          </LigatureSet>
          <LigatureSet glyph="cid01465">
            <Ligature components="cid01540" glyph="uniE126"/>
            <Ligature components="cid01539" glyph="cid01466"/>
          </LigatureSet>
          <LigatureSet glyph="cid01467">
            <Ligature components="cid01540" glyph="uniE127"/>
            <Ligature components="cid01539" glyph="cid01468"/>
          </LigatureSet>
          <LigatureSet glyph="cid01469">
            <Ligature components="cid01540" glyph="uniE128"/>
            <Ligature components="cid01539" glyph="cid01470"/>
          </LigatureSet>
          <LigatureSet glyph="cid01471">
            <Ligature components="cid01540" glyph="uniE129"/>
            <Ligature components="cid01539" glyph="cid01472"/>
          </LigatureSet>
さしすせそ
          <LigatureSet glyph="cid01473">
            <Ligature components="cid01540" glyph="uniE12A"/>
            <Ligature components="cid01539" glyph="cid01474"/>
          </LigatureSet>
          <LigatureSet glyph="cid01475">
            <Ligature components="cid01540" glyph="uniE12B"/>
            <Ligature components="cid01539" glyph="cid01476"/>
          </LigatureSet>
          <LigatureSet glyph="cid01477">
            <Ligature components="cid01540" glyph="uniE12C"/>
            <Ligature components="cid01539" glyph="cid01478"/>
          </LigatureSet>
          <LigatureSet glyph="cid01479">
            <Ligature components="cid01540" glyph="uniE12D"/>
            <Ligature components="cid01539" glyph="cid01480"/>
          </LigatureSet>
          <LigatureSet glyph="cid01481">
            <Ligature components="cid01540" glyph="uniE12E"/>
            <Ligature components="cid01539" glyph="cid01482"/>
          </LigatureSet>
たちっつてと
          <LigatureSet glyph="cid01483">
            <Ligature components="cid01540" glyph="uniE12F"/>
            <Ligature components="cid01539" glyph="cid01484"/>
          </LigatureSet>
          <LigatureSet glyph="cid01485">
            <Ligature components="cid01540" glyph="uniE130"/>
            <Ligature components="cid01539" glyph="cid01486"/>
          </LigatureSet>
          <LigatureSet glyph="cid01487">
            <Ligature components="cid01540" glyph="uniE1C1"/>
            <Ligature components="cid01539" glyph="uniE191"/>
          </LigatureSet>
          <LigatureSet glyph="cid01488">
            <Ligature components="cid01540" glyph="uniE131"/>
            <Ligature components="cid01539" glyph="cid01489"/>
          </LigatureSet>
          <LigatureSet glyph="cid01490">
            <Ligature components="cid01540" glyph="uniE132"/>
            <Ligature components="cid01539" glyph="cid01491"/>
          </LigatureSet>
          <LigatureSet glyph="cid01492">
            <Ligature components="cid01540" glyph="uniE133"/>
            <Ligature components="cid01539" glyph="cid01493"/>
          </LigatureSet>
なにぬねの
          <LigatureSet glyph="cid01494">
            <Ligature components="cid01540" glyph="uniE134"/>
            <Ligature components="cid01539" glyph="uniE105"/>
          </LigatureSet>
          <LigatureSet glyph="cid01495">
            <Ligature components="cid01540" glyph="uniE135"/>
            <Ligature components="cid01539" glyph="uniE106"/>
          </LigatureSet>
          <LigatureSet glyph="cid01496">
            <Ligature components="cid01540" glyph="uniE135"/>
            <Ligature components="cid01539" glyph="uniE107"/>
          </LigatureSet>
          <LigatureSet glyph="cid01497">
            <Ligature components="cid01540" glyph="uniE136"/>
            <Ligature components="cid01539" glyph="uniE108"/>
          </LigatureSet>
          <LigatureSet glyph="cid01498">
            <Ligature components="cid01540" glyph="uniE137"/>
            <Ligature components="cid01539" glyph="uniE109"/>
          </LigatureSet>
はひふへほ
          <LigatureSet glyph="cid01499">
            <Ligature components="cid01540" glyph="cid01501"/>
            <Ligature components="cid01539" glyph="cid01500"/>
          </LigatureSet>
          <LigatureSet glyph="cid01502">
            <Ligature components="cid01540" glyph="cid01504"/>
            <Ligature components="cid01539" glyph="cid01503"/>
          </LigatureSet>
          <LigatureSet glyph="cid01505">
            <Ligature components="cid01540" glyph="cid01507"/>
            <Ligature components="cid01539" glyph="cid01506"/>
          </LigatureSet>
          <LigatureSet glyph="cid01508">
            <Ligature components="cid01540" glyph="cid01510"/>
            <Ligature components="cid01539" glyph="cid01509"/>
          </LigatureSet>
          <LigatureSet glyph="cid01511">
            <Ligature components="cid01540" glyph="cid01513"/>
            <Ligature components="cid01539" glyph="cid01512"/>
          </LigatureSet>
まみむめも
          <LigatureSet glyph="cid01514">
            <Ligature components="cid01540" glyph="uniE139"/>
            <Ligature components="cid01539" glyph="uniE10A"/>
          </LigatureSet>
          <LigatureSet glyph="cid01515">
            <Ligature components="cid01540" glyph="uniE13A"/>
            <Ligature components="cid01539" glyph="uniE10B"/>
          </LigatureSet>
          <LigatureSet glyph="cid01516">
            <Ligature components="cid01540" glyph="uniE13B"/>
            <Ligature components="cid01539" glyph="uniE10C"/>
          </LigatureSet>
          <LigatureSet glyph="cid01517">
            <Ligature components="cid01540" glyph="uniE13C"/>
            <Ligature components="cid01539" glyph="uniE10D"/>
          </LigatureSet>
          <LigatureSet glyph="cid01518">
            <Ligature components="cid01540" glyph="uniE13D"/>
            <Ligature components="cid01539" glyph="uniE10E"/>
          </LigatureSet>
ゃやゅゆょよ
          <LigatureSet glyph="cid01519">
            <Ligature components="cid01540" glyph="uniE1D3"/>
            <Ligature components="cid01539" glyph="uniE1A3"/>
          </LigatureSet>
          <LigatureSet glyph="cid01520">
            <Ligature components="cid01540" glyph="uniE13E"/>
            <Ligature components="cid01539" glyph="uniE10F"/>
          </LigatureSet>
          <LigatureSet glyph="cid01521">
            <Ligature components="cid01540" glyph="uniE1D4"/>
            <Ligature components="cid01539" glyph="uniE1A4"/>
          </LigatureSet>
          <LigatureSet glyph="cid01522">
            <Ligature components="cid01540" glyph="uniE13F"/>
            <Ligature components="cid01539" glyph="uniE110"/>
          </LigatureSet>
          <LigatureSet glyph="cid01523">
            <Ligature components="cid01540" glyph="uniE1D5"/>
            <Ligature components="cid01539" glyph="uniE1A5"/>
          </LigatureSet>
          <LigatureSet glyph="cid01524">
            <Ligature components="cid01540" glyph="uniE140"/>
            <Ligature components="cid01539" glyph="uniE111"/>
          </LigatureSet>
らりるれろ
          <LigatureSet glyph="cid01525">
            <Ligature components="cid01540" glyph="uniE141"/>
            <Ligature components="cid01539" glyph="uniE112"/>
          </LigatureSet>
          <LigatureSet glyph="cid01526">
            <Ligature components="cid01540" glyph="uniE142"/>
            <Ligature components="cid01539" glyph="uniE113"/>
          </LigatureSet>
          <LigatureSet glyph="cid01527">
            <Ligature components="cid01540" glyph="uniE143"/>
            <Ligature components="cid01539" glyph="uniE114"/>
          </LigatureSet>
          <LigatureSet glyph="cid01528">
            <Ligature components="cid01540" glyph="uniE144"/>
            <Ligature components="cid01539" glyph="uniE115"/>
          </LigatureSet>
          <LigatureSet glyph="cid01529">
            <Ligature components="cid01540" glyph="uniE145"/>
            <Ligature components="cid01539" glyph="uniE116"/>
          </LigatureSet>
わゐゑをん
          <LigatureSet glyph="cid01531">
            <Ligature components="cid01540" glyph="uniE146"/>
            <Ligature components="cid01539" glyph="uniE117"/>
          </LigatureSet>
          <LigatureSet glyph="cid01532">
            <Ligature components="cid01540" glyph="uniE147"/>
            <Ligature components="cid01539" glyph="uniE118"/>
          </LigatureSet>
          <LigatureSet glyph="cid01533">
            <Ligature components="cid01540" glyph="uniE148"/>
            <Ligature components="cid01539" glyph="uniE119"/>
          </LigatureSet>
          <LigatureSet glyph="cid01534">
            <Ligature components="cid01540" glyph="uniE149"/>
            <Ligature components="cid01539" glyph="uniE11A"/>
          </LigatureSet>
          <LigatureSet glyph="cid01535">
            <Ligature components="cid01540" glyph="uniE14A"/>
            <Ligature components="cid01539" glyph="uniE11B"/>
          </LigatureSet>
ゝ
          <LigatureSet glyph="cid01543">
            <Ligature components="cid01539" glyph="cid01544"/>
          </LigatureSet>
ァアィイゥウェエォオ
          <LigatureSet glyph="cid01547">
            <Ligature components="cid01540" glyph="uniE280"/>
            <Ligature components="cid01539" glyph="uniE250"/>
          </LigatureSet>
          <LigatureSet glyph="cid01548">
            <Ligature components="cid01540" glyph="uniE200"/>
            <Ligature components="cid01539" glyph="uniE1E0"/>
          </LigatureSet>
          <LigatureSet glyph="cid01549">
            <Ligature components="cid01540" glyph="uniE281"/>
            <Ligature components="cid01539" glyph="uniE251"/>
          </LigatureSet>
          <LigatureSet glyph="cid01550">
            <Ligature components="cid01540" glyph="uniE201"/>
            <Ligature components="cid01539" glyph="uniE1E1"/>
          </LigatureSet>
          <LigatureSet glyph="cid01551">
            <Ligature components="cid01540" glyph="uniE282"/>
            <Ligature components="cid01539" glyph="uniE252"/>
          </LigatureSet>
          <LigatureSet glyph="cid01552">
            <Ligature components="cid01540" glyph="uniE202"/>
            <Ligature components="cid01539" glyph="cid01630"/>
          </LigatureSet>
          <LigatureSet glyph="cid01553">
            <Ligature components="cid01540" glyph="uniE283"/>
            <Ligature components="cid01539" glyph="uniE253"/>
          </LigatureSet>
          <LigatureSet glyph="cid01554">
            <Ligature components="cid01540" glyph="uniE203"/>
            <Ligature components="cid01539" glyph="uniE1E3"/>
          </LigatureSet>
          <LigatureSet glyph="cid01555">
            <Ligature components="cid01540" glyph="uniE284"/>
            <Ligature components="cid01539" glyph="uniE254"/>
          </LigatureSet>
          <LigatureSet glyph="cid01556">
            <Ligature components="cid01540" glyph="uniE204"/>
            <Ligature components="cid01539" glyph="uniE1E4"/>
          </LigatureSet>
カキクケコ
          <LigatureSet glyph="cid01557">
            <Ligature components="cid01540" glyph="uniE205"/>
            <Ligature components="cid01539" glyph="cid01558"/>
          </LigatureSet>
          <LigatureSet glyph="cid01559">
            <Ligature components="cid01540" glyph="uniE206"/>
            <Ligature components="cid01539" glyph="cid01560"/>
          </LigatureSet>
          <LigatureSet glyph="cid01561">
            <Ligature components="cid01540" glyph="uniE207"/>
            <Ligature components="cid01539" glyph="cid01562"/>
          </LigatureSet>
          <LigatureSet glyph="cid01563">
            <Ligature components="cid01540" glyph="uniE208"/>
            <Ligature components="cid01539" glyph="cid01564"/>
          </LigatureSet>
          <LigatureSet glyph="cid01565">
            <Ligature components="cid01540" glyph="uniE209"/>
            <Ligature components="cid01539" glyph="cid01566"/>
          </LigatureSet>
サシスセソ
          <LigatureSet glyph="cid01567">
            <Ligature components="cid01540" glyph="uniE20A"/>
            <Ligature components="cid01539" glyph="cid01568"/>
          </LigatureSet>
          <LigatureSet glyph="cid01569">
            <Ligature components="cid01540" glyph="uniE20B"/>
            <Ligature components="cid01539" glyph="cid01570"/>
          </LigatureSet>
          <LigatureSet glyph="cid01571">
            <Ligature components="cid01540" glyph="uniE20C"/>
            <Ligature components="cid01539" glyph="cid01572"/>
          </LigatureSet>
          <LigatureSet glyph="cid01573">
            <Ligature components="cid01540" glyph="uniE20D"/>
            <Ligature components="cid01539" glyph="cid01574"/>
          </LigatureSet>
          <LigatureSet glyph="cid01575">
            <Ligature components="cid01540" glyph="uniE20E"/>
            <Ligature components="cid01539" glyph="cid01576"/>
          </LigatureSet>
タチッツテト
          <LigatureSet glyph="cid01577">
            <Ligature components="cid01540" glyph="uniE20F"/>
            <Ligature components="cid01539" glyph="cid01578"/>
          </LigatureSet>
          <LigatureSet glyph="cid01579">
            <Ligature components="cid01540" glyph="uniE210"/>
            <Ligature components="cid01539" glyph="cid01580"/>
          </LigatureSet>
          <LigatureSet glyph="cid01581">
            <Ligature components="cid01540" glyph="uniE291"/>
            <Ligature components="cid01539" glyph="uniE261"/>
          </LigatureSet>
          <LigatureSet glyph="cid01582">
            <Ligature components="cid01540" glyph="uniE211"/>
            <Ligature components="cid01539" glyph="cid01583"/>
          </LigatureSet>
          <LigatureSet glyph="cid01584">
            <Ligature components="cid01540" glyph="uniE212"/>
            <Ligature components="cid01539" glyph="cid01585"/>
          </LigatureSet>
          <LigatureSet glyph="cid01586">
            <Ligature components="cid01540" glyph="uniE213"/>
            <Ligature components="cid01539" glyph="cid01587"/>
          </LigatureSet>
ナニヌネノ
          <LigatureSet glyph="cid01588">
            <Ligature components="cid01540" glyph="uniE214"/>
            <Ligature components="cid01539" glyph="uniE1E5"/>
          </LigatureSet>
          <LigatureSet glyph="cid01589">
            <Ligature components="cid01540" glyph="uniE215"/>
            <Ligature components="cid01539" glyph="uniE1E6"/>
          </LigatureSet>
          <LigatureSet glyph="cid01590">
            <Ligature components="cid01540" glyph="uniE216"/>
            <Ligature components="cid01539" glyph="uniE1E7"/>
          </LigatureSet>
          <LigatureSet glyph="cid01591">
            <Ligature components="cid01540" glyph="uniE217"/>
            <Ligature components="cid01539" glyph="uniE1E8"/>
          </LigatureSet>
          <LigatureSet glyph="cid01592">
            <Ligature components="cid01540" glyph="uniE218"/>
            <Ligature components="cid01539" glyph="uniE1E9"/>
          </LigatureSet>
ハヒフヘホ
          <LigatureSet glyph="cid01593">
            <Ligature components="cid01540" glyph="cid01595"/>
            <Ligature components="cid01539" glyph="cid01594"/>
          </LigatureSet>
          <LigatureSet glyph="cid01596">
            <Ligature components="cid01540" glyph="cid01598"/>
            <Ligature components="cid01539" glyph="cid01597"/>
          </LigatureSet>
          <LigatureSet glyph="cid01599">
            <Ligature components="cid01540" glyph="cid01601"/>
            <Ligature components="cid01539" glyph="cid01600"/>
          </LigatureSet>
          <LigatureSet glyph="cid01602">
            <Ligature components="cid01540" glyph="cid01604"/>
            <Ligature components="cid01539" glyph="cid01603"/>
          </LigatureSet>
          <LigatureSet glyph="cid01605">
            <Ligature components="cid01540" glyph="cid01607"/>
            <Ligature components="cid01539" glyph="cid01606"/>
          </LigatureSet>
マミムメモ
          <LigatureSet glyph="cid01608">
            <Ligature components="cid01540" glyph="uniE219"/>
            <Ligature components="cid01539" glyph="uniE1EA"/>
          </LigatureSet>
          <LigatureSet glyph="cid01609">
            <Ligature components="cid01540" glyph="uniE21A"/>
            <Ligature components="cid01539" glyph="uniE1EB"/>
          </LigatureSet>
          <LigatureSet glyph="cid01610">
            <Ligature components="cid01540" glyph="uniE21B"/>
            <Ligature components="cid01539" glyph="uniE1EC"/>
          </LigatureSet>
          <LigatureSet glyph="cid01611">
            <Ligature components="cid01540" glyph="uniE21C"/>
            <Ligature components="cid01539" glyph="uniE1ED"/>
          </LigatureSet>
          <LigatureSet glyph="cid01612">
            <Ligature components="cid01540" glyph="uniE21D"/>
            <Ligature components="cid01539" glyph="uniE1EE"/>
          </LigatureSet>
ャヤュユョヨ
          <LigatureSet glyph="cid01613">
            <Ligature components="cid01540" glyph="uniE2A3"/>
            <Ligature components="cid01539" glyph="uniE273"/>
          </LigatureSet>
          <LigatureSet glyph="cid01614">
            <Ligature components="cid01540" glyph="uniE21E"/>
            <Ligature components="cid01539" glyph="uniE1EF"/>
          </LigatureSet>
          <LigatureSet glyph="cid01615">
            <Ligature components="cid01540" glyph="uniE2A4"/>
            <Ligature components="cid01539" glyph="uniE274"/>
          </LigatureSet>
          <LigatureSet glyph="cid01616">
            <Ligature components="cid01540" glyph="uniE21F"/>
            <Ligature components="cid01539" glyph="uniE1F0"/>
          </LigatureSet>
          <LigatureSet glyph="cid01617">
            <Ligature components="cid01540" glyph="uniE2A5"/>
            <Ligature components="cid01539" glyph="uniE275"/>
          </LigatureSet>
          <LigatureSet glyph="cid01618">
            <Ligature components="cid01540" glyph="uniE220"/>
            <Ligature components="cid01539" glyph="uniE1F1"/>
          </LigatureSet>
ラリルレロ
          <LigatureSet glyph="cid01619">
            <Ligature components="cid01540" glyph="uniE221"/>
            <Ligature components="cid01539" glyph="uniE1F2"/>
          </LigatureSet>
          <LigatureSet glyph="cid01620">
            <Ligature components="cid01540" glyph="uniE222"/>
            <Ligature components="cid01539" glyph="uniE1F3"/>
          </LigatureSet>
          <LigatureSet glyph="cid01621">
            <Ligature components="cid01540" glyph="uniE223"/>
            <Ligature components="cid01539" glyph="uniE1F4"/>
          </LigatureSet>
          <LigatureSet glyph="cid01622">
            <Ligature components="cid01540" glyph="uniE224"/>
            <Ligature components="cid01539" glyph="uniE1F5"/>
          </LigatureSet>
          <LigatureSet glyph="cid01623">
            <Ligature components="cid01540" glyph="uniE225"/>
            <Ligature components="cid01539" glyph="uniE1F6"/>
          </LigatureSet>
ワヰヱヲン
          <LigatureSet glyph="cid01625">
            <Ligature components="cid01540" glyph="uniE226"/>
            <Ligature components="cid01539" glyph="cid01633"/>
          </LigatureSet>
          <LigatureSet glyph="cid01626">
            <Ligature components="cid01540" glyph="uniE227"/>
            <Ligature components="cid01539" glyph="cid01634"/>
          </LigatureSet>
          <LigatureSet glyph="cid01627">
            <Ligature components="cid01540" glyph="uniE228"/>
            <Ligature components="cid01539" glyph="cid01635"/>
          </LigatureSet>
          <LigatureSet glyph="cid01628">
            <Ligature components="cid01540" glyph="uniE229"/>
            <Ligature components="cid01539" glyph="cid01636"/>
          </LigatureSet>
          <LigatureSet glyph="cid01629">
            <Ligature components="cid01540" glyph="uniE22A"/>
            <Ligature components="cid01539" glyph="uniE1F7"/>
          </LigatureSet>
ヽ
          <LigatureSet glyph="cid01639">
            <Ligature components="cid01539" glyph="cid01640"/>
          </LigatureSet>


Flashで外部音声ファイル(wav形式)を再生

$
0
0

http://helpx.adobe.com/jp/flash/using/using-sounds-flash.htmlを読むと興味深い記述があった。

Flash Professional に読み込むことのできるサウンドファイル形式は、次のとおりです。

Adobe Sound(*.asnd)。Adobe® Soundbooth™ のネイティブサウンド形式です。
Wave(.wav)
AIFF(.aif、.aifc)
mp3

その他にも、以下のサウンドファイル形式を読み込むこともできます。
Sound Designer® II(.sd2)
Sun AU(.au、.snd)
FLAC(.flac)
Ogg Vorbis(.ogg、.oga)

これはホントなのか。 oggも再生可能か試してみた。

外部mp3,wav,oggをストリーミング再生してみる

http://snipplr.com/view/31915/as3-loading-and-playing-an-external-mp3-file/のコードを元に、以下をビルド。 swfと同じフォルダーに test.wav, test.mp3, test.oggを配置。

package {
    import flash.display.Sprite;
    import flash.events.Event;
    import flash.media.Sound;
    import flash.media.SoundChannel;
    import flash.net.URLRequest;

    /**
     * ...
     * @author foo
     */
    public class Main extends Sprite {
        private var preloadBottom:Number;

        public function Main():void {
            if (stage) init();
            else addEventListener(Event.ADDED_TO_STAGE, init);
        }

        private function init(e:Event = null):void {
            removeEventListener(Event.ADDED_TO_STAGE, init);
            // entry point

            var snd:Sound = new Sound();
            var chnl:SoundChannel = new SoundChannel();
            snd.load(new URLRequest('test.mp3'));
            //snd.load(new URLRequest('test.ogg'));
            //snd.load(new URLRequest('test.wav'));
            snd.addEventListener(Event.COMPLETE, onComplete, false, 0, true);
            function onComplete(e:Event):void {
                chnl = snd.play();
            }
        }
    }
}

mp3ならストリーミング再生可能。oggとwavは不可。と分かった。

ogg対応なのは、Flash Proでflaファイルにoggを埋め込んだときのことだろう。 ストリーミング(外部ファイル読み込み)だとmp3のみ使えるということだね。

ライブラリ使用してwavとogg対応?

しかし、外部wavやoggファイルを再生する方法があるという。

外部oggファイルはよく分からず。

http://stackoverflow.com/questions/9165189/flash-as3-ogg-sound-delayed-adobe-alchemy-libraryhttp://labs.byhook.com/2011/02/22/ogg-vorbis-encoder-decoder-for-flash/を見るとできるようだが、後者から実際にDLしてサンプルswfをローカルで動かし、ローカルのoggを再生してみたら、2m00s(2分0秒)のoggファイル(465KB)のデコードに30秒くらいかかるし、音声が2倍速で再生されてる感じ。これは常用は難しい。

as3wavsound で外部wav再生

まあwavだけでも対応してみよう。 うん、こっちは簡単。

http://stackoverflow.com/questions/12538076/playing-successive-wav-sounds-in-as3を参考に、FlashDevelpのsrcフォルダー以下に、as3wavsound https://code.google.com/p/as3wavsound/を展開して出てきたsrc以下のフォルダーをcopy。 swfと同じフォルダー(bin)以下に test.wavを配置。 src/Main.asは以下。

package {
    import flash.display.Sprite;
    import flash.events.Event;
    import flash.net.URLLoader;
    import flash.net.URLRequest;
    import flash.utils.ByteArray;
    import org.as3wavsound.WavSound;
    import org.as3wavsound.WavSoundChannel;

    /**
     * ...
     * @author foo
     */
    public class Main extends Sprite {

        public function Main():void {
            if (stage) init();
            else addEventListener(Event.ADDED_TO_STAGE, init);
        }

        private function init(e:Event = null):void {
            removeEventListener(Event.ADDED_TO_STAGE, init);
            // entry point

            var ld:URLLoader = new URLLoader();
            ld.dataFormat = 'binary'; //この行は必要だった
            ld.load(new URLRequest('test.wav'));
            ld.addEventListener(Event.COMPLETE, onComplete);

            function onComplete(e:Event):void {
                var snd:WavSound = new WavSound(e.currentTarget.data as ByteArray);
                var chnl:WavSoundChannel = snd.play();
            }
        }
    }
}

デコード時間ほぼ無しでいきなり再生。こっちは問題なく使える。

注意すべきはwavファイルのフォーマットで 44100/22050/11025 kHz で、かつ 8/16 bitだけ対応。48000kHzや24bitはムリなのね。モノラルは再生できた。


TTXを使用してTrueTypeフォントのcmapテーブルを修正

$
0
0

IPAゴシック」フォントの「饅」(U+9945) 「頭」(U+982D)を、「○」(U+25CB)で表示するためのTTX使用方法を説明。

[話者]『さいきん「饅頭(まんじゅう)」の「饅」「頭」の2文字を見るだけで、顔が青ざめて‥‥』という人がいるとする。

[合いの手]それは大変だね(棒)

[話者]IPAゴシック」というフォントの「饅」(U+9945) 「頭」(U+982D)を、「○」(U+25CB)で表示されるようにしよう。

FontForgeIPAゴシックの個々の字形を修正してもよいのだが http://itouhiro.hatenablog.com/entry/20140910/fontで書いたようにFontForgeで読み書きするとフォントがおかしくなることがある。

ここはFontForgeでフォントを書き出すのではなく、TTX/FontToolsでフォントのcmapテーブルを修正する方法を説明する。

[合いの手]「饅」はわかるけど、 U+9945 は何? どこで調べるの?

[話者] U+9945 というのはUnicodeのコードポイントだよ。文字番号。

Unicodeでは、文字集合中の文字をあらわす符号位置(コードポイント、符号点を参照)に、「Unicodeスカラ値」という非負整数値が割り振られている。Unicodeスカラ値は "U+"の後に十六進法でその値を続けることで表す。

引用元: http://ja.wikipedia.org/wiki/Unicode

テキストエディターのMeryなら文字の前にカーソルもってくればUnicode値を表示する。

f:id:itouhiro:20141004145225p:plain

それ以外でも、「饅 Unicode」でGoogle検索で検索すれば分かる。

グリフ名

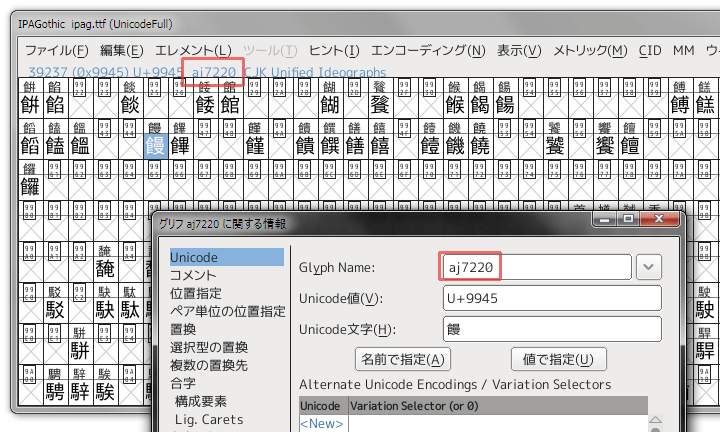
まずグリフ(字形)名を見てみよう。この「IPAゴシック」の場合 「饅」(U+9945)のグリフ名は aj7220だな。FontForgeだと[エレメント-グリフ情報-Glyph Name]で確認できるぞ。

f:id:itouhiro:20141004112014p:plain

同様に「頭」(U+982D)のグリフ名は aj3204

f:id:itouhiro:20141004112144p:plain

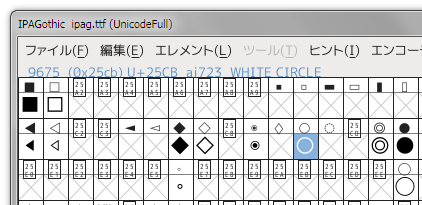
「○」(U+25CB)のグリフ名は aj723

f:id:itouhiro:20141004112945p:plain

[合いの手]グリフ(字形)ごとに名前がついているのか。

[話者]このグリフ名はフォントごとに異なる。 たとえばNasuフォントだと「饅」(U+9945)のグリフ名は cid44662だったりする。

cmapテーブルを取り出し書き換える

TTXを使い、cmapテーブルを取り出す。 TTXの導入方法は http://itouhiro.hatenablog.com/entry/20140910/font参照。

$ ttx -t cmap ipag.ttf
Dumping "ipag.ttf" to "ipag.ttx"...
Dumping 'cmap' table...
$

ipag.ttxの中身はこんな感じ。

      ...
      <map code="0x25cb" name="aj723"/><!-- WHITE CIRCLE -->
      ...
      <map code="0x9945" name="aj7220"/><!-- CJK UNIFIED IDEOGRAPH-9945 -->
      ...
      <map code="0x982d" name="aj3204"/><!-- CJK UNIFIED IDEOGRAPH-982D -->
      ...

f:id:itouhiro:20141004114039p:plain

[合いの手]確かに U+9945 のnameは aj7220になっているね。

[話者]このcmapテーブル定義を以下のように書き換える。

      ...
      <map code="0x25cb" name="aj723"/><!-- WHITE CIRCLE -->
      ...
      <map code="0x9945" name="aj723"/><!-- CJK UNIFIED IDEOGRAPH-9945 -->
      ...
      <map code="0x982d" name="aj723"/><!-- CJK UNIFIED IDEOGRAPH-982D -->
      ...

[合いの手]「饅」(U+9945) 「頭」(U+982D)のnameを aj723に変更したのか。

[話者]ここで注意だ。

<map code="0x9945" name="aj7220"/><!-- CJK UNIFIED IDEOGRAPH-9945 -->

の行、

<map code="0x982d" name="aj3204"/><!-- CJK UNIFIED IDEOGRAPH-982D -->

の行は「複数」ある。すべて書き換えなくてはならないので、テキストエディターの「すべて置換」などを使おう。

[合いの手]一つじゃないんだ?

[話者]このフォントの場合だと、cmapのformatとplatformIDで以下の3つがあって、

<cmap_format_4 platformID="0" platEncID="3" language="0"> ..  </cmap_format_4>

    <cmap_format_4 platformID="3" platEncID="1" language="0"> ..  </cmap_format_4>

    <cmap_format_12 platformID="3" platEncID="10" format="12" reserved="0" length="124000" language="0" nGroups="10332"> .. </cmap_format_4>

それぞれが

<map code="0x9945" name="aj7220"/><!-- CJK UNIFIED IDEOGRAPH-9945 -->

を含んでいるんだ。 だからそれを全部書き換える必要がある。

cmapのformatについては http://vanillasky-room.cocolog-nifty.com/blog/2008/02/opentype6cmap-d.htmlに説明あり。

フォーマット4は2バイトエンコーディングフォーマットである。フォーマット8、10、12は4バイトエンコーディングフォーマットである。MicrosoftWindows向けのサロゲートペアに対応したUnicodeフォントを作成する時、フォーマット4とフォーマット12を組み合わせて使うように推奨している。

cmapのplatformIDについては http://vanillasky-room.cocolog-nifty.com/blog/2008/02/opentype3name-a.htmlに説明あり。

プラットフォームIDプラットフォーム名
0Unicode
1Macintosh
2ISO
3Microsoft
4カスタム

[合いの手]ふうん。

cmapテーブルを置き換えたTrueTypeフォントを生成

[話者]そしてttxファイル名をipag.ttxからipag_new.ttxにでも変えておく。 そして新しいttfファイルを生成。

$ ttx -m ipag.ttf ipag_new.ttx
Compiling "ipag_new.ttx" to "ipag_new.ttf"...
Parsing 'cmap' table...
$

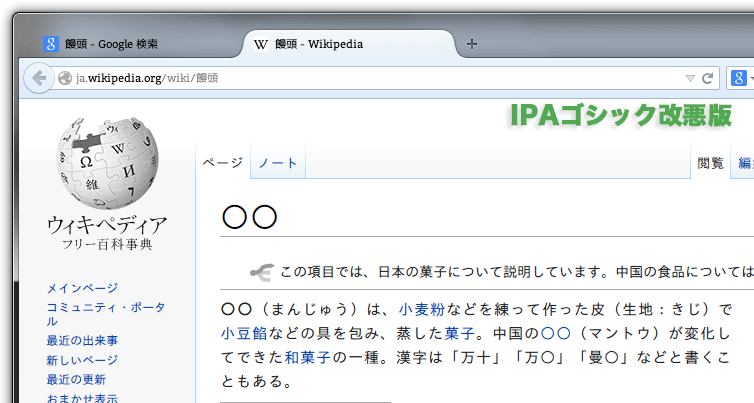
f:id:itouhiro:20141004122046p:plain

f:id:itouhiro:20141004122055p:plain

[話者]「○」(U+25CB)の表示も「○」のままだ。 つまり、以下の3つの文字は、同じ字形で表示されることになる。

  • 「饅」(U+9945)
  • 「頭」(U+982D)
  • 「○」(U+25CB)

[合いの手]確かに表示は変わったね。しかし特定の文字を見たくないという個人の些細な感情をこんな技術で満たしてよいのだろうか。

スクリプト

[話者] node.jsのスクリプトにした。

使い方は以下。WindowsのPortableGit(msysgit) https://github.com/msysgit/msysgit/releases環境で実行している。

rm *.ttx *_new*; node cmapReplace.js foo.ttf

cmapReplace.js

var fs = require('fs');
var exec = require('child_process').exec;

if (process.argv.length != 3){
  console.log('usage: rm *.ttx *_new*; node cmapReplace.js foo.ttf');
  process.exit(0);
}

var orgFontFileName = process.argv[2];
exec('ttx -t cmap '+ orgFontFileName, function(err, stdoutTxt, stderrTxt){
  console.log('ttx -t cmap '+ orgFontFileName);
  console.log(stdoutTxt+stderrTxt);
  var orgTtxName = orgFontFileName.replace(/\.ttf/i, '.ttx');

  var newTtxName = replaceCmap(orgTtxName);

  exec('ttx -m '+ orgFontFileName + ' ' + newTtxName, function(err, stdoutTxt, stderrTxt){
    console.log('ttx -m '+ orgFontFileName + ' ' + newTtxName);
    console.log(stdoutTxt+stderrTxt);
  });
});


function replaceCmap(orgFileName){
  var fileContent = fs.readFileSync(orgFileName) + '';
  fileContent = fileContent.replace(/\r/g, '').replace(/\uFEFF/g, '').replace(/\n*$/, '');
  var lines = fileContent.split(/\n/);

  var ngChars = '0x9945 0x982d'.split(' '); //「饅」「頭」
  var toBeReplaced = '0x25cb'; //「○」

  var toBeGlyphName = getGlyphName(toBeReplaced, lines);

  for(var i=0; i<ngChars.length; i++){
    var ngGlyphName = getGlyphName(ngChars[i], lines);
    fileContent = fileContent.replace(new RegExp(ngGlyphName+'"','g'), toBeGlyphName+'"')
  }

  var newFileName = orgFileName.replace('\.ttx','_new.ttx');
  fs.writeFileSync(newFileName, fileContent);
  console.log('(replace): ' + orgFileName + ' -> ' + newFileName);
  return newFileName;
}

function getGlyphName(theGlyph, lines){
  var m;
  var n;
  for (var i=0; i<lines.length; i++){
    if (lines[i].match(theGlyph)){
      if (m = lines[i].match('name="([^\"]+)"/>')){
        return m[1];
      }
    }
  }
  console.log('error: '+theGlyph+' not found.');
  process.exit(-1);
}


Fonts & Encodings

Fonts & Encodings

TTXを使用してTrueTypeフォントのglyfテーブルを修正

$
0
0

IPAゴシック」フォントの「‼」(U+203C)、「⁉」(U+2049)の字形を修正する。ただしFontForgeをフォント出力に使わない。TTX/FontToolsでglyfテーブルを書き換えてフォントを出力する。

TTXを使用してTrueTypeフォントのcmapテーブルを修正
http://itouhiro.hatenablog.com/entry/20141004/font
の続き

[話者]Unicodeには「!!」「!?」をそれぞれ1文字にした

‼  U+203C
⁉  U+2049

が用意されているんだが、全角幅と規定されていない。

[合いの手]漫画のセリフでよく使われてるね。漫画のセリフはたいてい縦書きだから、全角になってると便利なんだけど。 ところで「規定」ってどこかにルールでもあるのかい?

[話者]wikipedia:東アジアの文字幅http://www.unicode.org/reports/tr11/に解説があるよ。具体的には http://www.unicode.org/Public/UCD/latest/ucd/にある EastAsianWidth.txtが決めてる。

203C..203D;N     # Po     [2] DOUBLE EXCLAMATION MARK..INTERROBANG
...
2047..2051;N     # Po    [11] DOUBLE QUESTION MARK..TWO ASTERISKS ALIGNED VERTICALLY

とある。203Cも2049も N つまり「日本語圏では使われていなかった」とかいう理由で幅が決まってない。全角にしてるフォントもあるけど、IPAゴシックでは半角なんだよね。

そこで、手作業で全角にしてみるだろ。

FontForgeで字形修正

もともとは半角。

f:id:itouhiro:20141004175119p:plain

[メトリック>幅を設定]で2048にして全角幅にする。全角!?の字形をコピーペーストする。

f:id:itouhiro:20141004175133p:plain

FontForgeで[ファイル>フォントを出力] でTrueTypeフォントを出力する。[ ] Validate Before Savingのチェックを外すと素早く保存されるぞ。

f:id:itouhiro:20141004175304p:plain

ちなみにFontForgeの[ファイル>保存]でsfdファイルを保存して、そのsfdファイルを読む込むと何かおかしくなっていたりする。sfdよりttfで保存するほうがむしろ信頼性があると感じる。

[合いの手]でもFontForgeIPAゴシックを「TrueTypeフォント」出力すると、 http://itouhiro.hatenablog.com/entry/20140910/fontに書いたとおりフォントがおかしくなるよね。直さなくていいの?

[話者]直さなくていいよ。字形変更したTrueTypeフォントで、実際に使うのはglyfテーブルだけだからね。

TTXで字形置き換え

双方のglyfテーブルをTTXで出力する。 ipag.ttfが変更前のフォント。 IPAGothic.ttfは変更したフォント。

$ ttx -t glyf ipag.ttf
Dumping "ipag.ttf" to "ipag.ttx"...
Dumping 'glyf' table...

$ ttx -t glyf IPAGothic.ttf
Dumping "IPAGothic.ttf" to "IPAGothic.ttx"...
Dumping 'glyf' table...

$

このあと、ipag.ttxファイルを書き換える。 IPAGothic.ttxに含まれる、変更した字形のグリフ名(aj12111.hwaj12112.hw)の箇所だけを、ipag.ttxに持ってくればいい。

手作業でテキストエディターで書き換えてもいいんだけど、ttxファイルひとつで52MBもあったりして、あと何文字も置き換えるのはスクリプトのほうが確実なので、ここではnode.jsスクリプトで書き換えることにする。

glyfReplace.js

var fs = require('fs');

if (process.argv.length != 4){
  console.log('usage: node this.js origianl.ttx newglyph.ttx');
  process.exit(1);
}

var replaceCharacters = 'aj12111.hw aj12112.hw'; //U+203C, U+2049

var repChars = replaceCharacters.split(' ');
var orgFile = fs.readFileSync(process.argv[2]) + '';
var glyfFile = fs.readFileSync(process.argv[3]) + '';

var i;
for(i=0; i<repChars.length; i++){
  var re = '[ \t]*<TTGlyph name="' +repChars[i]+ '"[\\s\\S]*?</TTGlyph>'; 
  var re2 = '[ \t]*<TTGlyph name="' +repChars[i]+ '"/><!-- contains no outline data -->'; 
  var matchGlyph = glyfFile.match(RegExp(re));
  var newGlyph = matchGlyph[0];

  var m;
  var matched;
  if (m = orgFile.match(re)){
    //console.log('orgFile match ' + repChars[i]);
    matched = m[0];
    orgFile = orgFile.replace(matched, newGlyph);
  }else{
    console.log(repChars[i] + ' not match.');
    m = orgFile.match(re2);
    if (m){
      matched = m[0];
      orgFile = orgFile.replace(matched, newGlyph);
    }else{
      console.log(repChars[i] + ' not match. ignored.');
    }
  }
}
fs.writeFileSync('new.ttx', orgFile);

このスクリプト

$ node glyfReplace.js ipag.ttx IPAGothic.ttx

と使うと、新しく new.ttxが作られる。

それを使って、もとのipag.ttfのglyfテーブルを置き換え。

$ ttx -m ipag.ttf new.ttx
Compiling "new.ttx" to "new.ttf"...
Parsing 'glyf' table...

new.ttfが修正版のフォントだ。

f:id:itouhiro:20141004182718p:plain

[合いの手]確かに変わったぞ。


Fonts & Encodings

Fonts & Encodings


ActionScript3でBulkLoaderを使い複数の外部ファイルを読み込む

$
0
0

Flash ActionScript3で複数の外部ファイルを読み込むには、BulkLoaderが便利なようだ。使ってみる。

f:id:itouhiro:20141006122929j:plain

https://github.com/arthur-debert/BulkLoaderで最新版を取得して、srcに展開し、以下をビルド。

package {
    import flash.display.Bitmap;
    import flash.display.MovieClip;
    import flash.display.Sprite;
    import flash.events.Event;
    import br.com.stimuli.loading.BulkLoader;
    import br.com.stimuli.loading.BulkProgressEvent;
    import flash.text.TextField;
    import flash.text.TextFormat;
    import flash.utils.ByteArray;
    import org.as3wavsound.WavSound;
    import org.as3wavsound.WavSoundChannel;

    /**
     * ...
     * @author foo
     */
    [SWF(width = "410", height = "580", frameRate = "30", backgroundColor = "0x888888")]
    public class Main extends Sprite {
        private var loader:BulkLoader;

        public function Main():void {
            if (stage) init();
            else addEventListener(Event.ADDED_TO_STAGE, init);
        }

        private function init(e:Event = null):void {
            removeEventListener(Event.ADDED_TO_STAGE, init);
            // entry point

            loader = new BulkLoader('main');
            loader.addEventListener(BulkProgressEvent.COMPLETE, onLoadComplete);
            loader.addEventListener(BulkProgressEvent.PROGRESS, onLoadProgress);
            loader.add('test.jpg', { id:'bg1', priority:20 } );
            loader.add('test.png');
            loader.add('test.swf', { pausedAtStart:true } );
            loader.add('test.txt');
            loader.add('test.wav', { id:'bgm1', type:BulkLoader.TYPE_BINARY } );
            loader.start();
        }

        private function onLoadProgress(e:BulkProgressEvent):void {
            // https://github.com/arthur-debert/BulkLoader/wiki/Reporting-Loading-Progress
            // trace('ratio:'+e.percentLoaded+' (loaded'+e.bytesLoaded+', total:'+e.bytesTotal+')'); bytesTotalが0のまま
            trace('items loaded:'+e.itemsLoaded+', total:'+e.itemsTotal);
        }

        private function onLoadComplete(e:BulkProgressEvent):void {
            // https://github.com/arthur-debert/BulkLoader/wiki/Accessing-Loaded-Content

            addChild(loader.getBitmap('bg1'));

            var chara:Bitmap = loader.getBitmap('test.png');
            chara.y = 580-252;
            addChild(chara);

            var mc:MovieClip = loader.getMovieClip('test.swf');
            mc.x = 310;
            addChild(mc);

            var theTxt:String = loader.getText('test.txt');
            var tf:TextField = new TextField();
            tf.defaultTextFormat = new TextFormat('Noto Sans Japanese Regular', 16, 0x000000);
            tf.wordWrap = true;
            var speechBaloon:MovieClip = new MovieClip();
            speechBaloon.graphics.beginFill(0xffffff, 0.5);
            speechBaloon.graphics.drawRoundRect(15, 15, 380, 200, 5, 5);
            speechBaloon.graphics.endFill();
            addChild(speechBaloon);
            tf.x = 20;
            tf.y = 20;
            tf.width = 370;
            tf.height = 190;
            tf.text = theTxt;
            addChild(tf);

            var snd:WavSound = new WavSound(loader.getBinary('test.wav'));
            var chnl:WavSoundChannel = snd.play();
        }
    }
}

動作はしている。swfのpausedAtStart:true は効いてないような。

使用した素材は以下。

外部音声のmp3はライセンス料問題があるのでwav。swfに内蔵させるんだったらmp3でいいんだけど。

参考になった資料

Progress Percentage

長いロード時間を待つには、ロード進捗率表示がほしい。 上のソースだと「ロード中アイテムの個数」しか表示しないので大ざっぱ過ぎる。

パーセンテージを表示するには https://github.com/arthur-debert/BulkLoader/wiki/Reporting-Loading-Progressによると各アイテムに weight を指定しろ、と書いてある。

ソースを以下にすると%表示できた。 ここではweightの数値は ファイルの容量(単位:バイト)にしているが、細かすぎる気はするので、単位をKBにしてよいと思う。

        private function init(e:Event = null):void {
            ...
            loader.add('test.jpg', { id:'bg1', priority:20, weight:9580 } );
            loader.add('test.png', { weight:36459 } );
            loader.add('test.swf', { pausedAtStart:true, weight:996 } );
            loader.add('test.txt', { weight: 486 } );
            loader.add('test.wav', { id:'bgm1', type:BulkLoader.TYPE_BINARY, weight:225164 } );
            ...
        }

        private function onLoadProgress(e:BulkProgressEvent):void {
            // https://github.com/arthur-debert/BulkLoader/wiki/Reporting-Loading-Progress
            // trace('ratio:'+e.percentLoaded+' (loaded'+e.bytesLoaded+', total:'+e.bytesTotal+')'); //bytesTotalが0のまま
            //trace('items loaded:'+e.itemsLoaded+', total:'+e.itemsTotal); //ロード中アイテムの個数
            trace('ratio:'+int(e.weightPercent*100)+' (loaded item'+e.itemsLoaded+', total item:'+e.itemsTotal+')');
        }


ActionScript 3.0 イメージエフェクト - スクリプトで作る画像効果

ActionScript 3.0 イメージエフェクト - スクリプトで作る画像効果

Uemaruフォント:縦長で等幅の丸ゴシックフリーフォント

$
0
0

Uemaru(うえまる)フォントを作成したので公開します。

f:id:itouhiro:20141012161429j:plain


濁点・半濁点を文字の上に付けたTrueTypeアウトラインフォントです。
「モトヤLマルベリ3等幅」を改変しました。 Uetenフォントの姉妹フォントになります。

Uemaru(うえまる)フォントの特徴

  • 丸ゴシックの等幅フォント
  • 少し縦長の字形。
  • 濁点・半濁点は文字の上に付く。
  • 半濁点が大きめ。
  • JIS第1・第2水準の文字をすべて収録。
  • 「モトヤLマルベリ3等幅」に存在しない記号をいくつか「M+ OUTLINE FONTS」から追加した。
  • 「あ」+「゛」のような濁点・半濁点合成字形を収録。外字または合字として使用可能。

仕様:

  • 縦書きに非対応。
  • 濁点・半濁点合成字形は「合字としては」Adobe製品では使用不可。外字としては可能。
  • ウェイト(太さ)はRegularしかない。

フォント名は「文字の上に半濁点(マル)をつける」ことから命名しました。

f:id:itouhiro:20141012171721p:plain

ダウンロード

version 2014.1012
https://sourceforge.jp/downloads/users/7/7303/uemaru-font-20141012.zip (3MB)

フリーフォントです。ライセンスはApache License。

改変箇所

  • 横幅を92%に縮小。つまり少し縦長の字形にした。
  • 濁点・半濁点を文字の上に付ける。
  • 存在しない記号をいくつか「M+ OUTLINE FONTS」から追加した。
  • 「あ」+「゛」のような濁点・半濁点合成字形を追加。
  • 「―」(U+2015 HORIZONTAL BAR)を横に伸ばした。
  • U+005C をバックスラッシュ字形にした。
  • 行幅(フォントの縦幅)を少し広くする。濁点・半濁点を上に置いたため。

Uetenフォントとの違い

Uetenフォント http://itouhiro.hatenablog.com/entry/20140502/fontと同じ作り方で作成しています。見た目は似ていますが、以下が違います。

フォント名改変元フォント収録文字ウェイト(太さ)ライセンス
UemaruモトヤLマルベリ3等幅JIS第1・第2水準すべて。さらに記号を追加1ウェイト(Regular)Apacheライセンス
UetenRounded M+フォント JIS第1水準すべて。第2水準は不完全7ウェイト(Thin/Regular/Bold/..)M+フォントライセンス

f:id:itouhiro:20141012165105p:plain

f:id:itouhiro:20141012165116p:plain

ページの読み込みを高速化し、Web アプリケーションや
オンラインゲームのパフォーマンスを強化しました。
美しいタイポグラフィ、タッチスクリーンインタフェース
「ビルより大きいって聞いてたのに……」
「――まあまあ、まずは挨拶からだ」
ア゙パ
あ゛は゜
あ゙い゙ゔえ゙お゙
カ゚キ゚ク゚ケ゚コ゚



合字/外字として使用

合字として使用

「あ U+3042」+「合成用濁点 U+3099」として入力。 http://itouhiro.hatenablog.com/entry/20140925/fontなどからコピーペーストするのが早いかも。

外字として使用

IME(ここではATOK2012)のUnicode文字パレットで、U+E100 以降の外字を入力。

f:id:itouhiro:20141012170929p:plain

外字としてならAdobe Illustratorなどでも表示可能。ゲームエンジンで使う場合も外字のほうが都合いいかも。

f:id:itouhiro:20141012171430p:plain

おまけ

Uemaruフォント作成途中のフォントも収録。

MLMaruCircle(エムエル・マル・サークル)フォント

uemaru-font-20141012/MLMaruCircle-W3-mono.ttfに収録。

Uemaruフォントとの違い:

  • 各文字の横幅を縮小していない。モトヤLマルベリ3等幅と同じ横幅。
  • 行幅(フォントの縦幅)もモトヤLマルベリ3等幅と同じ。
  • 濁点・半濁点は文字の上ではなく、モトヤLマルベリ3等幅と同じ位置にある。
  • 「ぱぴぷぺぽパピプペポ」の半濁点が大きい(140%)。
  • 「あ」+「゛」のような濁点・半濁点合成字形は収録していない。

仕様:

  • 縦書きに非対応。

フォント名は「モトヤLマルベリ3等幅」の英語名「MotoyaLMaru」を多少変えました。 ウェイトが Regular ではなく「W3 mono」になっているのは、「モトヤLマルベリ3等幅」と同じです。

f:id:itouhiro:20141012165130p:plain

f:id:itouhiro:20141012165138p:plain

ChangeLog

  • version 2014.1012
    • first release

License

  • Uemaruフォント・MLMaruCircleフォントは、Apache 2.0 License のもとで使用することができます。
  • 「モトヤLマルベリ3等幅」由来の文字グリフの著作権は株式会社モトヤ様が所有しています。
  • 「M+ OUTLINE FONTS」由来の文字グリフの著作権は M+ FONTS PROJECT 様が所有しています。

Copyright(C)2010 MOTOYA CO.,LTD.
Copyright(c) 2014 M+ FONTS PROJECT
Copyright(c) 2014 itouhiro

Copyright(c) 2014 itouhiro

Licensed under the Apache License, Version 2.0 (the "License");
you may not use this file except in compliance with the License.
You may obtain a copy of the License at

    http://www.apache.org/licenses/LICENSE-2.0

Unless required by applicable law or agreed to in writing, software
distributed under the License is distributed on an "AS IS" BASIS,
WITHOUT WARRANTIES OR CONDITIONS OF ANY KIND, either express or implied.
See the License for the specific language governing permissions and
limitations under the License.

Apache 2.0 License の日本語訳は、以下から参照することができます。 http://sourceforge.jp/projects/opensource/wiki/licenses%2FApache_License_2.0

作成環境

参考


WebAbornをGoogleChrome version34以降で使う

$
0
0

GoogleChrome version 34以降は、標準ではUserJavaScriptが使えなくなりました。

WebAborn http://webaborn.herokuapp.comはUserJavaScriptなので、動作させるには一工夫必要です。

対策としては、Tampermonkeyを入れるのが簡単なので、その方法を説明します。

確認環境

Tampermonkeyをインストール

GoogleChromeで以下にアクセスしてインストール。

https://chrome.google.com/webstore/detail/tampermonkey/dhdgffkkebhmkfjojejmpbldmpobfkfo?hl=ja

Tampermonkeyの設定

GoogleChrome[〓 > その他のツール > 拡張機能]を開く。

Tampermonkeyの ファイルの URL へのアクセスを許可するをチェック。

f:id:itouhiro:20141016182152p:plain

[オプション]をクリック。

Tampermonkeyオプション画面

[新規ファイル]アイコンをクリックして、以下のように入力して[保存]

f:id:itouhiro:20141016183217p:plain

// ==UserScript==
// @name         import_webaborn
// @namespace    http://webaborn.herokuapp.com
// @version      0.1
// @description  import local WebAborn.js
// @author       foo
// @require      file:///C:/WinApp/UserJavaScript/WebAborn.user.js
// @grant        none
// ==/UserScript==

WebAborn.user.jsを置く場所はどこでもよいが、配置したフォルダーを@requireで指定しておく。 ここではC:\WinApp\UserJavaScriptに配置した。

「インストール済みJavaScript」は次のようになる。

f:id:itouhiro:20141016182904p:plain

これで以下のようにWebAbornが機能するようになる。

f:id:itouhiro:20141016182944p:plain

今後は、WebAborn.user.jsを新しく更新したい場合、C:\WinApp\UserJavaScript\WebAborn.user.jsを新しいファイルに置き換えるだけでいい。

従来のGoogleChromeの場合は、WebAborn.user.jsを新しく置き換えたあとでWebブラウザーを再起動する必要があった。 しかしTampermonkeyの場合は、WebAborn.user.jsを置き換えたあとページをリロードするだけで反映される。Webブラウザーを再起動する必要はない。

参考: http://www.symmetric.co.jp/blog/archives/920


JavaScriptのイテレーション関数を復習

$
0
0

JavaScriptイテレーション関数を復習した。

GoogleChromeのDeveloperToolsで実際にJavaScript入力して確認。

f:id:itouhiro:20141207220210p:plain

この日本語説明は Array - JavaScript | MDNのIteration methodsを参考にした。

でも Underscore.js というのを使うと、さらにこういうヤツが追加されるんだよね‥‥。

http://gihyo.jp/dev/serial/01/underscorejs/0001によると

map,select,invokeなどの関数型プログラミングもサポートしています。

Underscore.jsで用意されているforEach,reduce,mapなどは,ECMAScript5の機能が実装されている環境ではそちらを使います。これにより無駄な処理が増えないため,実行速度が低下しません。その他,JavaScriptのビルトインのオブジェクト(object,Arrayなど)の拡張も行いませんので,プロトタイプ汚染の心配もありません。

ふむふむ。

Flash CS6のClassicTweenとMotionTweenとMask

$
0
0

Flash Pro CS6のマスクとTweenについて確認。

ClassicTween

ClassicTweenでは、MotionGuide(Pathに沿ってオブジェクトを動かす)を使うことは可能だけど、それをMaskにすることができない。Easing指定は効いてる。

ちなみにこのガイドの線に吸着するのは「オブジェクトの基準点(以下の画像では★の中心にある◎)」で、これは「編集-自由変形」で位置を変更できる。インスタンスごと(=KeyFrame毎)に「オブジェクトの基準点」位置変更が必要なようで面倒。最初と最後の2個のKeyFrameで吸着させる必要がある。

f:id:itouhiro:20141222042224p:plain

実際のFlash: https://sites.google.com/site/itouhiro/2013/20141222maskmove2.swf?attredirects=0

ClassicTween + Mask

Pathに沿って動かさない(=直線的な補完なので、KeyFrameを多めにして対応)なら、Maskにできる。しかしこれだとEasing指定(=スピード調節)は難しい。Easingは「次のKeyFrame」までの指定なので、KeyFrameが何個もあるとスピード調節はたぶんムリ。

f:id:itouhiro:20141222043628p:plain

実際のFlash: https://sites.google.com/site/itouhiro/2013/20141222maskmove1.swf?attredirects=0

MotionTween + Mask

MotionTweenでは、Maskにして、さらにPathに沿ってMaskを動かすことができる。のでスポットライト的な演出で「Pathに沿って動かしたい」ならコレ。Easing指定も効いてる=スピード調節が簡単のは大きい。ガイド線に吸着させる必要もない。このガイド線は「ダイレクト選択ツール(A)」でPath調整できる。

f:id:itouhiro:20141222042234p:plain

実際のFlash: https://sites.google.com/site/itouhiro/2013/20141222maskmove3.swf?attredirects=0

参考:

FadeOut

単なるClassicTween。

f:id:itouhiro:20141222055242p:plain

実際のFlash: https://sites.google.com/site/itouhiro/2013/20141222maskmove4.swf?attredirects=0

f:id:itouhiro:20141222060643p:plain

実際のFlash: https://sites.google.com/site/itouhiro/2013/20141222maskmove5.swf?attredirects=0

Viewing all 107 articles
Browse latest View live